#202 — FPV Ground Rover
Strap a drone camera and video transmitter onto a wheeled chassis for first-person-view exploration of tunnels, crawl spaces, and anywhere you can't fit.
Ratings
🧪 What Is It?
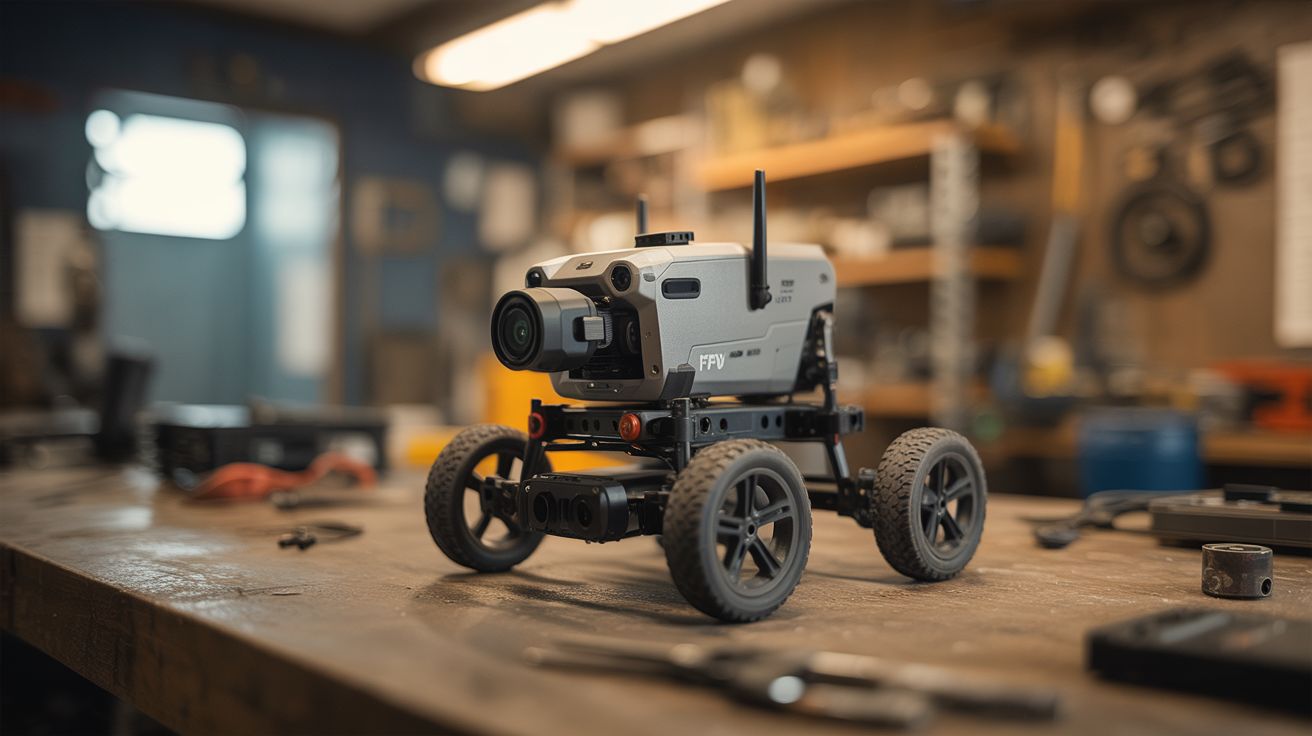
A remote-controlled ground vehicle with a live video feed straight to FPV goggles or a monitor — the same immersive first-person view that drone pilots use, but on wheels. The drone's camera and 5.8GHz video transmitter provide the eyes, while a simple RC car chassis provides the mobility. You drive from the vehicle's perspective, seeing exactly what it sees in real time.
The camera and video TX module from a crashed drone are already paired and tuned for low-latency analog video. Analog FPV has near-zero latency (under 20ms), which is critical for driving in tight spaces where digital systems would introduce a dangerous delay. The result is a rover that can explore storm drains, crawl spaces under buildings, dense undergrowth, or anywhere you want to look but can't physically go.
Add the drone's obstacle-avoidance sensors and you've got a rover that warns you before you drive into a wall. Add LED headlights and it explores in total darkness.
🧰 Ingredients
- Drone camera module with video transmitter (VTX) — salvaged from any FPV or DJI drone (source: crashed drone — free)
- FPV goggles or 5.8GHz monitor — to receive the video feed (online, ~$30-$80 for budget goggles)
- RC car chassis — 4WD preferred for rough terrain (toy store, thrift store, or online, ~$15-$30)
- RC transmitter and receiver — 2.4GHz, at least 2-channel (online or salvaged from RC car, ~$10-$20)
- LiPo battery — 2S or 3S, 1000-2200mAh (salvaged from drone, or online, ~$10)
- LED strip or flashlight module — for headlights (electronics supplier, ~$3)
- Zip ties, mounting brackets, foam padding (hardware store)
- XT60 or JST connectors to match your battery (electronics supplier)
🔨 Build Steps
- Prepare the chassis. If using a toy RC car, strip off the body shell and any unnecessary plastic. You want a flat platform on top for mounting electronics. If the car's stock motors and ESC are functional, keep them — they're already wired for the RC receiver. If not, replace with generic brushed DC motors and an ESC.
- Mount the camera. Attach the drone camera to the front of the chassis, angled slightly upward (about 10-15 degrees) so the horizon sits in the upper third of the frame. Use foam padding underneath to absorb vibration. Secure with zip ties or a 3D-printed bracket. The camera should be as low as possible to keep the center of gravity low.
- Install the video transmitter. Mount the VTX on the chassis with the antenna pointing straight up. Keep the VTX antenna away from metal parts and the RC receiver antenna to avoid interference. Connect the VTX to the camera — most drone camera/VTX combos use a standard connector or direct solder pads for power, ground, and video signal.
- Wire the power system. Connect the LiPo battery to a power distribution harness that feeds both the drive system (motors/ESC) and the FPV system (camera/VTX). Use a voltage regulator if the camera and VTX require 5V — most drone cameras run on 5V while LiPo packs output 7.4-11.1V. Many VTX modules have built-in regulators that accept a wide voltage range.
- Set up the RC control. Bind the RC transmitter to the receiver. Connect the receiver's channel outputs to the ESC (throttle) and a servo or differential mixer (steering). Test drive the car without FPV first to verify steering direction, throttle response, and braking.
- Tune the FPV frequency. Power on the VTX and set it to a clear channel (5.8GHz has 40+ channels). Set the FPV goggles or monitor to the same channel. You should see a live image from the camera. Adjust camera angle if the view is too high or too low.
- Add headlights. Wire a short LED strip or small flashlight module to the power system with a switch. Mount the LEDs at the front of the chassis, aimed forward. For underground or nighttime exploration, bright white LEDs are essential — the camera needs light to see.
- Reinforce and weatherproof. Apply hot glue or silicone to all solder joints and connectors to prevent vibration-induced disconnections. If you plan to drive through wet areas, wrap the electronics in plastic wrap or conformal coating, leaving only the camera lens and antenna exposed.
- Test in progressively challenging terrain. Start in an open room, then hallways, then outdoors on grass and gravel. Practice driving from FPV only — depth perception is different through a camera. Learn to judge distances before sending the rover into tight spaces.
⚠️ Safety Notes
- Video transmitters output RF energy. Do not power on a VTX without its antenna connected — this can burn out the transmitter instantly and permanently. Always connect the antenna first, then power.
- LiPo batteries must not be over-discharged. Set a low-voltage alarm or timer to prevent draining below 3.5V per cell. Over-discharged LiPos can become unstable.
- Be aware of local regulations regarding FPV frequencies and transmission power. In most countries, 5.8GHz at 25-200mW is legal for hobbyist use without a license. Higher power levels may require a ham radio license.
🔗 See Also
- Camera Gimbal Stabilizer — add a stabilized camera to this rover for smooth footage
- Obstacle-Dodging Robot — upgrade this rover with autonomous navigation using drone sensors