#272 — Hard Drive Platter Wind Chimes
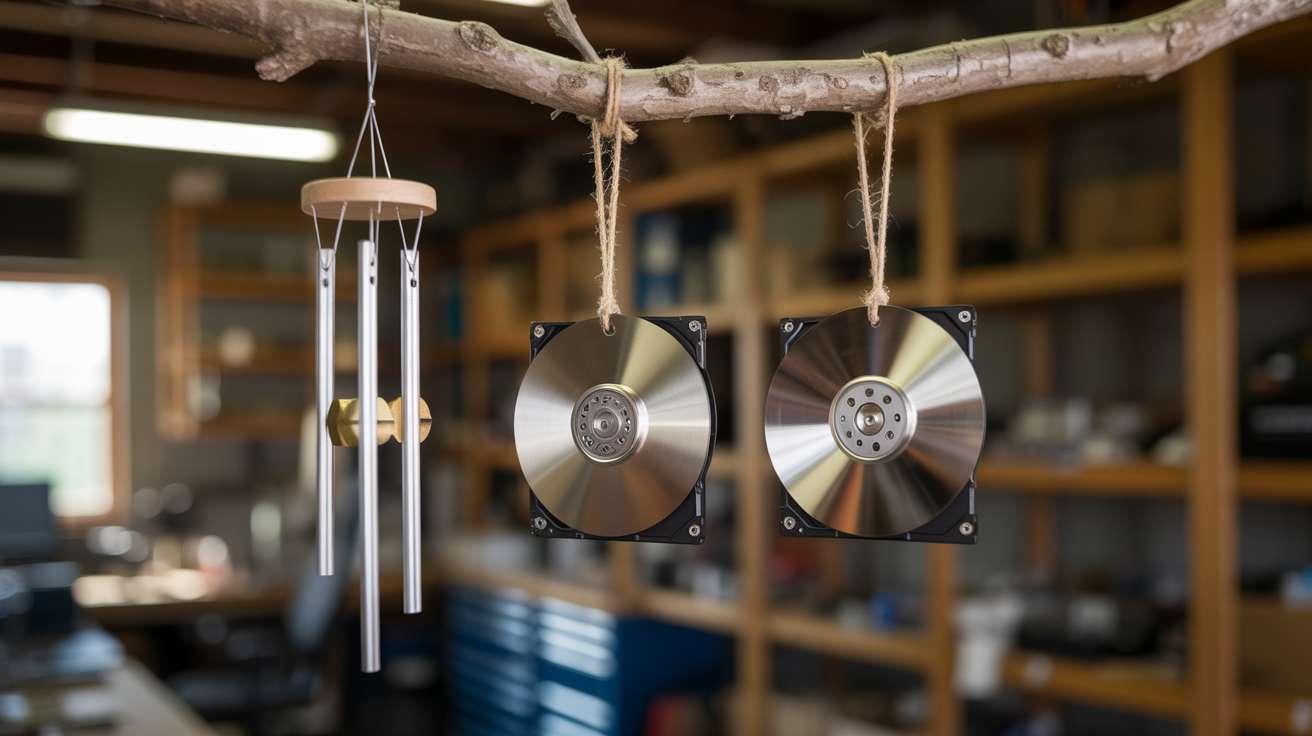
Salvaged hard drive platters ring like tiny bells. String a set from a branch and let the wind play your data's funeral song.
Ratings
🧪 What Is It?
Hard drive platters are precision-machined aluminum or glass disks polished to a mirror finish. They were designed to spin at 7,200 RPM while a read head floated nanometers above their surface. But when you tap one with a fingernail, something unexpected happens — it rings. A clear, bright, surprisingly musical tone that sustains for several seconds, like a tiny singing bowl made by an engineering team that had no idea they were building an instrument.
Different platters from different drives produce different pitches. Older drives tend to have thicker, heavier platters with lower tones. Laptop drive platters are smaller and higher-pitched. Glass platters (found in some newer drives) have a distinctly different timbre — brighter and more crystalline. Collect platters from five or six dead hard drives and you've got a set of tones that span nearly an octave.
String them from a branch or a metal frame, add a striker in the center, and you have wind chimes that look like salvaged spacecraft components, sound genuinely beautiful, and serve as the most aesthetically satisfying funeral rite your dead data has ever received. Every guest who visits will tap one, hear the ring, and ask where you got them. The answer — "those are the hard drives that used to hold my tax returns" — never gets old.
🧰 Ingredients
- 5-8 dead hard drives — different brands and sizes for pitch variety (e-waste bin, old computers, free)
- Torx screwdriver set — T6, T8, T9 to open hard drive cases (hardware store, $5-8)
- Fishing line or thin nylon cord — for hanging platters (tackle box or craft store, $2)
- Driftwood branch, copper pipe, or metal rod — the top bar to hang everything from (yard, hardware store, or scrap bin, free-$3)
- Small drill or Dremel — to make hanging holes near platter edges if needed (tool box, or skip if using center holes)
- Metal washer or old bolt — the striker that hangs in the center (junk drawer, free)
- Small eye hooks or S-hooks — to attach the top bar to a hanging point (hardware store, $1)
🔨 Build Steps
-
Disassemble the hard drives. Remove the case screws using Torx drivers. Some drives hide screws under labels — peel them back. Remove the lid and take out the platters. Most drives have a single retaining screw on the spindle. Remove it and the platters slide off. Set aside the magnets too — they are incredibly strong neodymium magnets useful for dozens of other builds.
-
Clean the platters. Wipe each platter with isopropyl alcohol to remove fingerprints and dust. Handle them by the edges — the mirror finish shows every smudge. If any platters have visible scratches from head crashes, those are fine — they still ring, and the scratches add character.
-
Test the tone of each platter. Hold each platter by pinching its center hole between two fingers (so the edges are free to vibrate) and tap the edge with a fingernail or small metal object. Listen to the pitch and sustain. Group them from lowest to highest. Discard any that sound dull or dead — occasionally a platter is damped by its material composition and does not ring well.
-
Arrange the platters by pitch. Lay them out in the order you want them to hang. Traditional wind chimes use a pentatonic scale layout (any order sounds pleasant), but with salvaged platters you are at the mercy of whatever pitches the manufacturing gods gave you. Arrange from longest sustain to shortest, or lowest to highest — whatever sounds best when you tap through the sequence.
-
Prepare the hanging points. Each platter needs a way to hang freely. The center spindle hole works if you thread fishing line through it with a small bead or knot underneath to prevent it from sliding. Alternatively, drill a small hole near the edge of each platter using a Dremel with a diamond bit (go slow on glass platters). The edge-hole method lets the platter hang at an angle, which changes the strike geometry and can improve the tone.
-
Prepare the top bar. Cut your branch, copper pipe, or metal rod to about 12-18 inches. Drill small holes or tie fishing line at evenly spaced points along it — one attachment point per platter, spaced so the platters can swing freely without touching each other at rest. Leave enough room between platters for the striker to move.
-
Hang the striker. Cut a length of fishing line from the center of the top bar, hanging straight down to roughly the center height of the platter ring. Tie a metal washer, bolt, or other small dense object to the end. This is the wind catcher and striker — when the wind blows, it swings into the surrounding platters and makes them ring. A heavier striker produces louder tones; a lighter one gives gentler, more frequent taps.
-
Hang the platters. Tie each platter to the top bar at its designated position. Adjust the line lengths so all platters hang at roughly the same height, with the striker centered among them. The platters should be close enough that a moderate wind swing of the striker reaches them, but not so close that they touch each other in still air. Typical spacing is 1-2 inches between platter edges.
-
Tune by adjusting line lengths. The pitch of each platter is fixed by its material, but you can adjust the strike point. A strike near the edge produces the clearest ring. A strike near the center hole produces a duller thud. Adjust platter heights so the striker naturally hits near the edges. Test in a light breeze or by hand-swinging the striker.
-
Hang and enjoy. Mount the finished chimes from a porch beam, tree branch, or ceiling hook. They look like something from a science fiction movie — mirror-finished disks spinning and catching light. In wind, they produce a clear, ethereal, metallic melody that sounds nothing like traditional bamboo or aluminum tube chimes. The reflective surfaces throw small rainbow light patches around the area as they spin.
⚠️ Safety Notes
- Hard drive platters can have sharp edges, especially if chipped. Handle carefully and sand any rough edges with fine sandpaper.
- Glass platters (found in some drives) can shatter if dropped. Wear eye protection when drilling glass platters, and use a diamond bit with water cooling. If a glass platter has any cracks, discard it.
- The neodymium magnets inside hard drives are extremely strong. Keep them away from credit cards, pacemakers, phones, and small children. They can pinch skin painfully if two snap together. Set them aside for other projects.