#260 — Toaster Reflow Oven
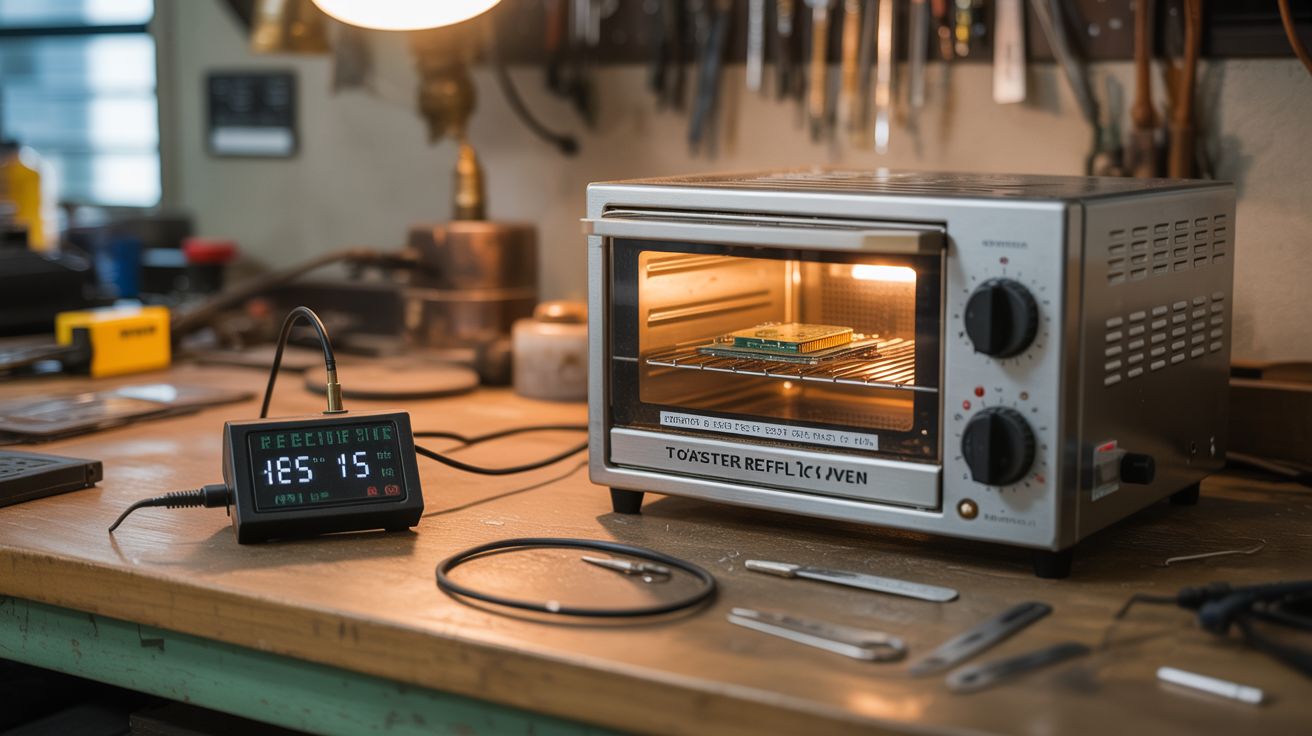
Thrift store toaster oven + PID controller + thermocouple = professional SMD soldering station for $15.
Ratings
🧪 What Is It?
Surface-mount electronics (SMD) are soldered using a precise temperature profile: ramp up slowly to preheat the board and components, soak at an intermediate temperature to activate the flux in the solder paste, spike to reflow temperature (230-250C for lead-free solder) where the paste melts and wets the pads, then cool down in a controlled curve. Every professional PCB assembly line uses a reflow oven for this. The ovens cost $500-5000. A thrift store toaster oven costs $5 and reaches the exact same temperatures — it just has no idea what temperature it's actually at and no ability to follow a programmed curve.
Add a thermocouple (a temperature sensor rated for extreme heat), a solid-state relay (an electronic switch for mains power), and an Arduino running a PID control algorithm, and the toaster oven becomes a precision instrument. The thermocouple reads the actual temperature inside the oven. The PID algorithm compares the actual temperature to the target temperature at each point in the reflow curve and switches the heating elements on and off through the SSR to track the profile within a few degrees. The OLED display shows the curve in real time so you can watch the temperature climb through preheat, soak, and reflow stages.
This is genuinely one of the most useful tool conversions in the entire collection. If you build electronics, a reflow oven transforms your capabilities. Hand-soldering 0402-sized components and QFN packages is miserable work with poor results. A reflow oven lets you stencil solder paste onto a PCB, place components with tweezers, slide the board in, press a button, and walk away. Six minutes later you have solder joints that are indistinguishable from factory work. Every maker space should have one, and now yours lives inside a Goodwill toaster oven.
🧰 Ingredients
- Toaster oven — countertop model, convection (with fan) preferred for even heating (thrift store, $5-8)
- K-type thermocouple — fiberglass insulated, rated to 400C+ (electronics supplier, $3)
- MAX6675 or MAX31855 thermocouple amplifier module — converts thermocouple signal to digital (electronics supplier, $3-5)
- Solid-state relay (SSR) — 25A DC-controlled AC output, SSR-25DA is the standard (electronics supplier, $5-8)
- Arduino Nano or Uno (electronics supplier, $5-15)
- Heatsink for SSR — SSRs generate heat proportional to load current (old CPU heatsink, electronics scrap — free)
- 0.96" OLED display — I2C, for real-time temperature curve (electronics supplier, $3-5)
- Push button — to start the reflow cycle (junk drawer, $0.25)
- Piezo buzzer — for stage-change alerts and completion alarm (electronics supplier, $0.50)
- High-temperature silicone wire — for the thermocouple feedthrough and internal connections (electronics supplier, $2)
- High-temperature silicone or furnace cement — for sealing the thermocouple hole (hardware store, $3)
- Enclosure or mounting plate — for the controller electronics (scrap aluminum, project box, $2)
- Solder paste — Sn63/Pb37 (leaded, easier, lower temp) or SAC305 (lead-free) (electronics supplier, $5-15 syringe)
🔨 Build Steps
-
Choose the toaster oven. Convection models with an internal fan distribute heat more evenly — temperature can vary 20-30C between spots in a non-convection oven, which means some components reflow while others don't. Small ovens are better: less thermal mass means faster heat-up, tighter temperature control, and quicker recovery after opening the door. Test the oven at max temperature with an oven thermometer to verify it reaches at least 250C.
-
Install the thermocouple. Drill a 3-4mm hole through the back or side of the oven, well away from heating elements. Thread the thermocouple probe through and position the tip near the center of the oven at the rack height where PCBs will sit. The tip should be in free air, not touching any metal surface — touching the rack or wall reads the metal's temperature, not the air temperature around the board. Seal the hole around the probe with high-temperature silicone or furnace cement.
-
Bypass or remove the original thermostat. The toaster oven's built-in thermostat is your enemy now — it will fight the PID controller by cutting power at random temperatures. Either bypass it (short its terminals so it's always "on") or remove it entirely. The SSR and your Arduino PID loop are the new thermostat. The oven's timer dial should also be set to "stay on" or bypassed — you don't want a mechanical timer killing power mid-reflow.
-
Wire the solid-state relay. The SSR goes in series with the oven's mains power. Cut the hot (live) wire of the power cord and route it through the SSR's AC load terminals — AC in on one terminal, AC out on the other. The SSR's DC control side (marked + and -) connects to the Arduino: positive to a digital output pin (pin 3), negative to Arduino GND. When pin 3 goes HIGH, the SSR conducts and the oven heats. LOW and it stops. Mount the SSR on its heatsink outside the oven — SSRs running at 10A+ get hot enough to melt plastic enclosures.
-
Wire the thermocouple amplifier. Connect the thermocouple leads to the MAX6675 or MAX31855 module (observe polarity — thermocouple wires are color-coded). Wire the module to the Arduino via SPI: CLK to pin 6, CS to pin 5, DO to pin 4 (or whatever your code expects). Power the module from the Arduino's 5V. Test by reading temperature over Serial — it should show room temperature accurately. Heat the probe tip with a lighter and watch the reading climb in real time.
-
Wire the display, button, and buzzer. Connect the OLED display via I2C (SDA to A4, SCL to A5 on Uno/Nano). Wire the push button between a digital pin and GND (enable internal pull-up in code). Wire the buzzer to another digital pin. The display will show: current temperature, target temperature, elapsed time, current stage name, and a real-time graph of the temperature curve.
-
Program the reflow profile. Code the Arduino with a state machine that steps through the reflow profile stages. Standard lead-free (SAC305) profile:
- Preheat: Ramp from ambient to 150C at 1-2C per second (60-90 seconds).
- Soak: Hold 150-200C for 60-90 seconds. Flux activates and volatiles evaporate.
- Reflow: Ramp to 245C peak, hold above 217C (liquidus) for 30-60 seconds. Solder melts and wets pads.
- Cooldown: Heating off, optionally crack oven door. Target 2-4C/second cooling. For leaded (Sn63/Pb37): same profile but reflow peak is only 210-220C. Use PID control within each stage to track the target temperature curve.
-
Tune the PID gains. This is where every oven is unique. Start with conservative values: Kp = 2.0, Ki = 0.01, Kd = 1.0. Run the full profile with an empty oven and watch the temperature curve on the display. If temperature overshoots the target, reduce Kp. If it oscillates, increase Kd. If it never quite reaches the target (steady-state error), increase Ki slightly. Repeat until the actual curve tracks the target within 5C at every stage. Document your gains — they won't change unless you modify the oven.
-
Run a test reflow. Apply solder paste to a test PCB (junk board or a cheap practice board). Place a few SMD components with tweezers. Load the board into the oven on the center of the rack. Press the start button and watch through the glass door. You'll see the solder paste change from gray and matte to liquid silver as it reflows — that's the money moment. After the cycle, let the board cool and inspect joints under magnification. They should be smooth, shiny, and concave (good wetting).
-
Mark the oven permanently. Write "NOT FOR FOOD" on every visible surface in permanent marker. Add tape over the plug when stored. Once used for reflow soldering, the interior is contaminated with flux residue and (if using leaded paste) lead. This oven can never be used for food again. Ever. Label it so your roommate doesn't make pizza rolls in your reflow oven.
⚠️ Safety Notes
- This project involves mains voltage (120V/240V AC). All high-voltage wiring must be done with the oven unplugged. Use appropriately rated wire, connectors, and insulation. Double-check all connections before plugging in. If you're not experienced with mains wiring, get hands-on help from someone who is. Mains voltage kills.
- Mount the SSR on a proper heatsink. An SSR at 10A drops about 1.5V across its output, dissipating 15W of heat. Without a heatsink, it will overheat and fail — potentially failing "on," which means your oven runs at full power with no control.
- Solder paste flux produces irritating fumes during reflow. Work in a ventilated area, near an open window, or add a small exhaust fan to the oven's vent. Do not breathe flux fumes directly.
- Once used for soldering, the oven is permanently contaminated. Lead solder residue is toxic — ingestion of even small amounts causes cumulative neurological damage. NEVER return this oven to food use.
- The oven exterior gets very hot during reflow cycles (250C+ inside). Keep flammable materials well away. Place the oven on a heat-resistant surface. Do not leave it unattended during a cycle.