#305 — Microwave Kiln
Your microwave is three minutes away from being a forge. The microwave itself doesn't even know.
Ratings
🧪 What Is It?
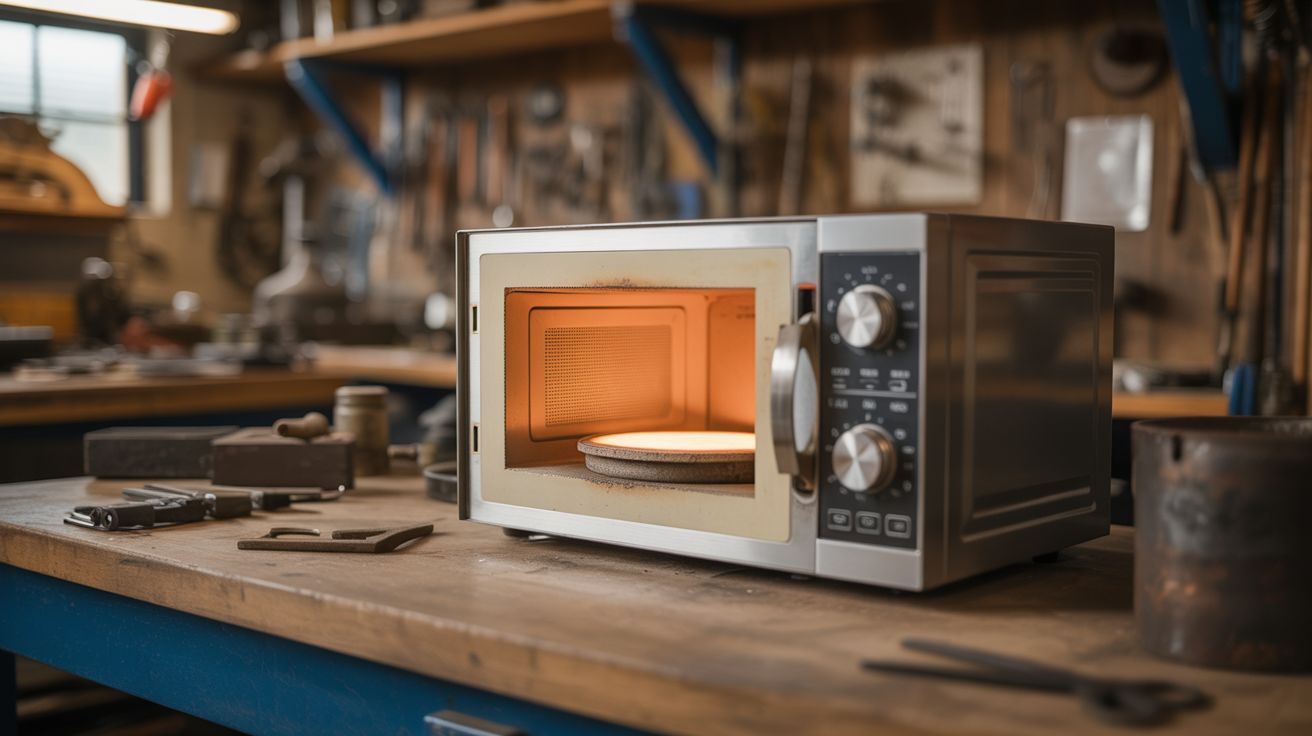
Microwaves heat food by blasting it with 2.45 GHz electromagnetic radiation, which excites water molecules. Most non-food materials — ceramics, glass, metals — don't absorb microwave radiation efficiently at room temperature. But silicon carbide does. Silicon carbide is a synthetic mineral that absorbs microwave energy and converts it directly into heat with terrifying efficiency. A shell of silicon carbide inside a microwave becomes a radiant furnace, reaching 1500–1800°F in under 10 minutes. Everything inside the shell gets heated by radiant energy from the glowing walls. Everything outside the shell — including the microwave oven itself — stays relatively cool because the insulating housing blocks the heat from escaping.
This is the microwave kiln: a hollow cylinder made of a silicon carbide inner shell surrounded by a ceramic fiber insulation jacket. You put things inside it, put the kiln inside a standard microwave, press the button, and walk away. The silicon carbide heats up, the interior reaches kiln temperatures, and whatever you placed inside gets fired, fused, melted, or annealed. The microwave oven is completely unmodified. You don't rewire anything, don't remove any panels, don't void any warranties (well, probably — using a kiln insert might qualify as "abnormal use" in the fine print, but the microwave doesn't know the difference between a kiln and a very ambitious casserole).
The applications are genuinely surprising. Fuse glass — layer pieces of dichroic and art glass, fire them for 3–5 minutes, and they melt together into jewelry pendants, tiles, and decorative pieces. Fire silver metal clay (PMC) — a material that's pure silver particles suspended in an organic binder; the kiln burns off the binder and sinters the silver particles into solid .999 fine silver. Anneal hardened steel — heat a knife blade or tool to cherry red and let it cool slowly to relieve internal stresses. Fire small ceramic pieces — glaze tests, beads, figurines. Melt small quantities of bronze, silver, or gold in a crucible for lost-wax casting. All of this in a microwave, in your kitchen, in minutes instead of the hours a conventional kiln requires.
🧰 Ingredients
- Microwave kiln — the silicon carbide/ceramic fiber insert; available commercially as "microwave kiln" or "fuseworks kiln" (craft supplier, online, $25–40)
- Microwave oven — standard 1000W+ countertop model; higher wattage reaches temperature faster (thrift store, $10–20)
- Kiln shelf paper or kiln wash — thin refractory separator that prevents molten glass from bonding permanently to the kiln floor (craft supplier, $3–5)
- Glass pieces — fusible art glass (COE 90 or COE 96), dichroic glass scraps, recycled bottle glass cut to shape (glass supplier, craft store, $5–15)
- Glass cutter and running pliers — for cutting glass to fit inside the kiln (hardware store, craft store, $8–12)
- Silver metal clay (PMC or Art Clay Silver) — for firing into solid silver (jewelry supply, $20–35 per 10g packet)
- Small crucible — for metal melting; silicon carbide or graphite, sized to fit inside the kiln (metalworking supplier, $5–10)
- Long-handled tongs or kiln gloves — for removing the 1500°F kiln from the microwave (craft supplier, hardware store, $8–15)
- Fire brick or ceramic tile — as a heatproof landing pad outside the microwave (hardware store, masonry supplier, $3–5)
- Infrared thermometer or pyrometer — for monitoring temperature through the microwave door (hardware store, $12–15)
- Safety glasses — IR-rated if watching the kiln through the door for extended periods (safety supplier, $5–10)
🔨 Build Steps
-
Select and test your microwave. You need at least 1000W — check the label on the back. Higher wattage (1100–1200W) reaches kiln temperatures faster and holds them more reliably. The microwave must have a functioning turntable — the kiln needs to rotate so all sides absorb microwave energy evenly. A stationary kiln develops hot spots on one side and cold spots on the other. Test the microwave empty for 30 seconds to verify the magnetron works and the turntable rotates. Thrift store microwaves are perfect for this. Dedicate this microwave to kiln use only — don't go back to making popcorn in it afterward.
-
Prepare the kiln shelf. Cut a piece of kiln shelf paper to fit the floor of the kiln cavity, or brush the floor with kiln wash (a refractory coating). This is a release layer. Without it, molten glass bonds permanently to the kiln floor and you'll spend an hour chiseling it off — or more likely, you'll destroy the kiln floor trying. Fresh shelf paper every firing is the move. It's cheap and saves you from learning this lesson the hard way.
-
Load the kiln for glass fusing (beginner project). Cut art glass into small pieces — 1" squares, strips, circles — using a glass cutter and running pliers. Layer them on the kiln floor on top of the shelf paper. Complementary colors layered on top of each other produce depth and complexity. Dichroic glass (glass with a metallic oxide coating that shifts color with viewing angle) makes spectacular pendants. Keep pieces within 1/4" of the same COE (coefficient of expansion) — mixing COE 90 and COE 96 glass causes internal stress that cracks the fused piece as it cools. This is not optional; it's physics.
-
Position the kiln in the microwave. Center the loaded kiln on the turntable. The kiln must be able to rotate freely without hitting the walls — check clearance with the door closed. If the kiln binds against the walls during rotation, it'll stall the turntable motor (burning it out over time) and heat unevenly. Most microwave kilns fit comfortably in standard-sized microwaves, but measure before you buy if you've got a compact model.
-
Fire the glass. Close the microwave door and set it for 3–5 minutes at full power. The general range: 2.5–3 minutes for a tack fuse (pieces stick together but retain their individual shapes and surface textures), 4–5 minutes for a full fuse (pieces melt into each other and the surface goes smooth and glossy), and 6+ minutes for a slump (everything melts flat into a puddle — useful for making flat cabochons but not much else). Every microwave and kiln combination is different, so your first few firings are calibration runs. Start at 3 minutes, inspect, and adjust from there. You'll figure out your kiln's sweet spot within two or three firings.
-
Watch the color through the door. As the kiln heats up, you can see the interior glow through the gap between the kiln lid and base. Dull red means about 1000°F. Bright orange is 1400°F. Yellow-white is 1600°F+ — that's too hot for glass fusing and means you've gone too long. For glass fusing, bright orange is the target. The microwave's interior light may interfere with reading the glow — turn it off if your model has that option, or just dim the room lights. Do not stand with your face pressed against the door for extended periods while the kiln is firing — the microwave door shielding blocks 2.45 GHz radiation but the kiln is also producing significant infrared radiation that passes through the door window.
-
Remove and cool. When the timer goes off, DO NOT open the kiln immediately. Use tongs or kiln gloves to carefully lift the entire kiln out of the microwave and set it on a fire brick or ceramic tile. The kiln exterior is hot but manageable — the insulation does its job. The interior is 1400°F+ and the contents are molten or semi-molten. Let the kiln cool with the lid on for at least 20 minutes. This slow cooling (annealing) prevents thermal shock from cracking the glass. Impatience is the number one cause of cracked glass pieces. If you peek after 5 minutes, the rush of cold air will thermal-shock your beautiful pendant into three pieces and a learning experience.
-
Fire silver metal clay. PMC (Precious Metal Clay) and Art Clay Silver are pure silver particles in an organic binder. Shape the clay into rings, pendants, or charms. Let it dry completely — overnight at room temperature or 10 minutes with a hair dryer. Place the dry piece on kiln shelf paper inside the kiln. Fire for 3–5 minutes at full power. The binder burns away and the silver particles sinter together into solid .999 fine silver. The piece shrinks 10–15% during firing (the binder was taking up space). Remove, cool, and polish with a brass brush and burnishing tool. The result is solid silver that can be hallmarked, set with stones, and sold as real jewelry — because it is real jewelry.
-
Anneal steel and melt small metals. For annealing a hardened knife blade or tool: place it in the kiln, fire until the interior is bright orange (about 5 minutes at full power), then remove the kiln and let it cool slowly with the lid on for an hour. The slow cool relieves internal stresses and softens the steel for reshaping or re-hardening. For metal melting: place a small silicon carbide or graphite crucible inside the kiln with small pieces of metal (silver, bronze, gold). Fire for 6–10 minutes at full power. Silver melts at 1763°F — a well-insulated kiln in a 1200W microwave can reach this. Gold melts at 1948°F, which is at the extreme upper end of what microwave kilns can achieve. Bronze at 1742°F is more accessible. Pour into a mold immediately upon removal. This is advanced work — practice with glass fusing first.
-
Maintain the kiln. After every few firings, inspect the silicon carbide coating on the inner surface of the kiln. If it's cracking, flaking, or showing bare ceramic fiber, the kiln is losing efficiency — the exposed fiber doesn't absorb microwaves, so the kiln heats slower and unevenly. Patch bare spots with silicon carbide kiln wash (available from ceramic suppliers) or replace the kiln. A well-maintained kiln lasts 50–100 firings. At $30 per kiln and 75 firings, that's $0.40 per firing. A conventional kiln uses $2–5 of electricity per firing. The microwave uses about $0.03 of electricity per firing. The math is absurd.
⚠️ Safety Notes
Spicy Level 3 build. Read the Safety Guide before starting.
- The kiln interior reaches 1500°F+. Treat it like the forge it is. Use proper tongs or kiln gloves rated for high temperature — regular oven mitts are not rated for this and will scorch through. Keep a fire brick or ceramic tile as a dedicated landing surface. Never set the hot kiln on a wooden table, plastic cutting board, or anything that burns or melts.
- Microwave radiation is shielded by the oven door, but verify your microwave door seal is intact before use. A simple test: place your cell phone inside the closed microwave (DON'T turn it on) and call it. If it rings, the shielding is compromised and the microwave should not be used. If the call fails, the Faraday cage is intact.
- Firing glass and metal clay can produce fumes — burning binder from PMC smells like an organic chemistry lab, and some glass coatings release trace metals when heated. Run the microwave in a ventilated area. An open window and a box fan pointing outward is sufficient for occasional hobby use.
- Molten glass and metal are obvious burn hazards, but the less obvious one is thermal shock. Opening the kiln too early or placing hot glass on a cold surface causes violent cracking — shards can fly several inches. Always cool the kiln with the lid on and never quench hot glass in water unless you want a physics lesson delivered as shrapnel.
- Do not attempt to fire closed containers, sealed objects, or anything with trapped moisture in the kiln. Steam from trapped water expands explosively at kiln temperatures. Greenware ceramics must be bone-dry before firing. Found objects and rocks should be avoided — some contain pockets of moisture or volatile minerals that pop like popcorn at 1400°F.
- This microwave is now a kiln accessory. Label it. Do not reheat leftover soup in your forge.