#268 — Laser Tripwire Security System
Invisible security from a $2 laser. Every spy movie you have ever watched just became a weekend project.
Ratings
🧪 What Is It?
The concept is beautifully simple and has appeared in approximately ten thousand heist movies: a laser beam shines across a doorway or hallway to a photosensor on the other side. When someone walks through the beam, the sensor goes dark and triggers an alarm. In the movies, the lasers are always visible (and usually red) so the protagonist can do acrobatic contortions to avoid them. In reality, you can use an infrared laser that is completely invisible to the human eye, which is considerably more useful and significantly less cinematic.
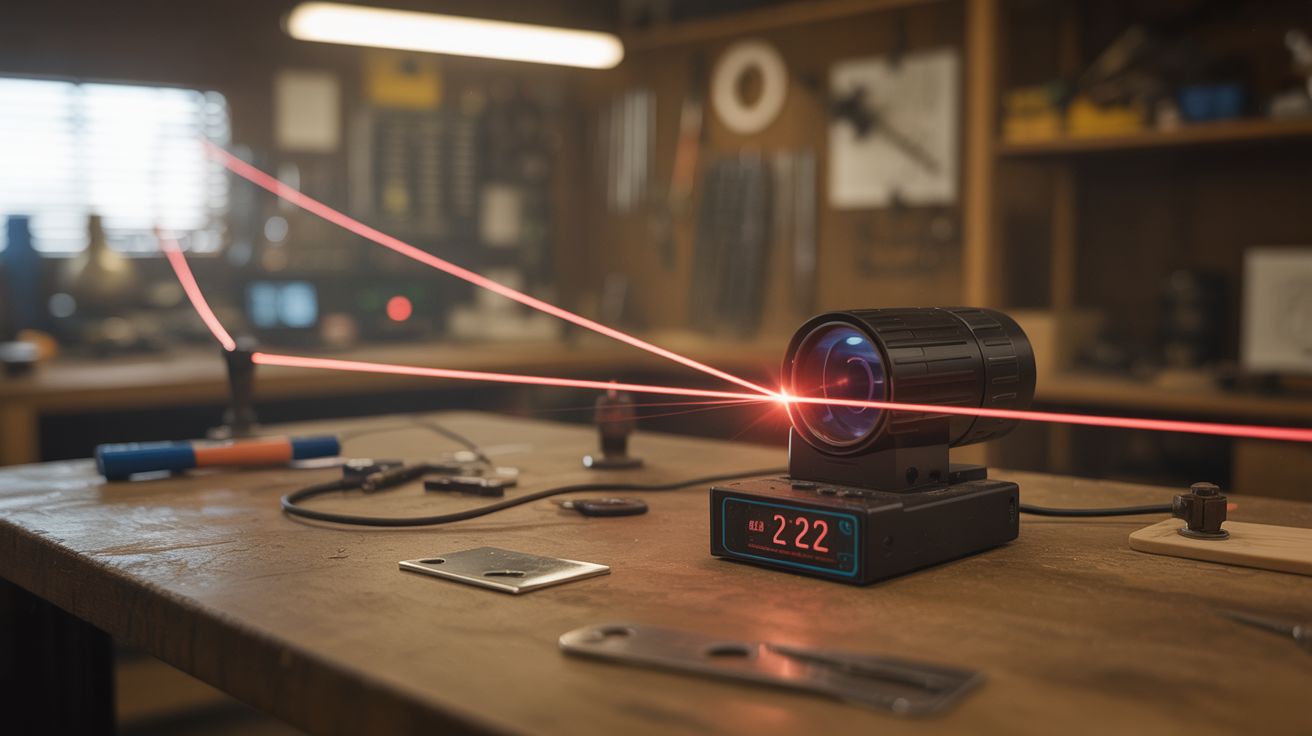
A single laser-to-sensor link gives you a basic tripwire. But the real fun starts when you add mirrors. A single laser beam can bounce off multiple mirrors to create a web of invisible lines across a space — like a laser maze without the acrobatics. Break any segment and the photosensor at the end of the chain goes dark, triggering the alarm. One laser, several mirrors, complete perimeter coverage.
Add an ESP32 or ESP8266 instead of a basic Arduino and you get WiFi connectivity — which means push notifications to your phone when the beam is broken. Timestamp every event, add a cooldown timer so you do not get bombarded with alerts, and you have a wireless security system that cost less than a large pizza and runs on a USB power bank. It will not replace a professional security system, but for monitoring a workshop, catching siblings entering your room, protecting a garden from deer, or building an elaborate laser maze for a Halloween party, it is perfect.
🧰 Ingredients
- Laser pointer or laser module — red for visible, infrared for truly invisible operation (dollar store, electronics supplier, $2-5)
- Photoresistor (LDR) or photodiode — to detect the beam (electronics supplier, $0.50)
- Arduino Nano, ESP32, or ESP8266 — ESP variants add WiFi for phone notifications (electronics supplier, $3-8)
- Piezo buzzer or siren module — for audible alarm (electronics supplier, $1-3)
- Small mirrors — 2-4 for bouncing the beam around corners (craft store, makeup compact salvage, $1-3)
- Mirror mounts — clothespins, binder clips, or small angle brackets (junk drawer, hardware store, free-$2)
- 10k ohm resistor — for the photoresistor voltage divider (electronics supplier, $0.10)
- USB power bank or wall adapter — for power (junk drawer, free)
- Small tube or shroud — drinking straw or pen barrel to shield the photosensor from ambient light (junk drawer, free)
- LED (optional) — for visual alarm indicator (electronics supplier, $0.25)
- Relay module (optional) — to trigger external devices like lights, sirens, or cameras (electronics supplier, $2)
🔨 Build Steps
-
Set up the basic beam path. Mount the laser on one side of the area you want to monitor — a doorway, hallway, window, or shelf. Mount the photosensor directly across from it. Power on the laser and aim it so the beam hits the photosensor dead center. Start with a direct line-of-sight path, no mirrors. This is your proof of concept: verify that the sensor reliably reads "beam present" and that blocking the beam with your hand causes a clear, large change in the sensor reading.
-
Build the sensor circuit. Wire the photoresistor as a voltage divider: one leg to 5V (or 3.3V for ESP32), the other leg through a 10k ohm resistor to ground. The junction connects to an analog input on your microcontroller. When the laser hits the LDR, its resistance drops and the junction voltage rises. When the beam is blocked, resistance increases and voltage drops. Read the analog value and record both the "beam on" and "beam off" numbers. Your detection threshold should sit clearly between these two values — if they are close together, ambient light is interfering.
-
Add ambient light rejection. Slide a short tube (cut drinking straw, pen barrel, or rolled electrical tape) over the photosensor. Point the open end directly at the laser. This blocks room light from all directions except straight ahead — where the laser is. Without this shroud, changes in room lighting (someone turning on a lamp, sunlight moving across the floor, a TV flickering) cause false triggers that will make the system useless within an hour. The tube should be 2-3 inches long for effective rejection.
-
Program the alarm logic. Write code that continuously reads the sensor value in a loop. When the reading drops below the detection threshold (beam broken), trigger the alarm: activate the buzzer, flash an LED, send a notification, or all three. Add a short debounce delay (100-200ms) to avoid false triggers from momentary flickers caused by dust particles in the beam, flying insects, or vibration. Add a re-arm delay after triggering (1-5 seconds) so the alarm does not scream continuously while someone stands in the beam.
-
Add mirror bounces for perimeter coverage. Mount small mirrors at corners and turns in the area you want to protect. Aim the laser at the first mirror, adjust the mirror angle so the beam bounces to the second mirror, then to the third, and finally to the photosensor at the end of the chain. Each mirror-to-mirror segment creates a separate tripwire zone. One laser can cover an entire room perimeter with 3-4 mirrors. The alignment is the most time-consuming part — work from the laser forward, adjusting each mirror until the beam reaches the next one. Use clothespins or binder clips as improvised mirror mounts — they grip the mirror securely and allow fine angle adjustments.
-
Lock down the alignment. Once all mirrors are aligned and the beam reaches the sensor, lock every mount in place. A mirror that drifts even 2 degrees redirects the beam several feet at the far end of the chain, which means the sensor loses the signal and the alarm triggers constantly (or never, depending on which way it drifts). Hot glue the mirror mounts to their surfaces. Add small dabs of putty behind the mirrors to prevent vibration-induced rotation. Test over 24 hours before considering the alignment stable.
-
Add WiFi notifications (ESP32/ESP8266). If using an ESP board, connect to your home WiFi network and send push notifications when the beam breaks. Use a free service like Pushover (simple HTTP POST, excellent phone app), IFTTT (webhook trigger to any action), or a Telegram bot (HTTP API, free, easy setup). Each option takes about 10-15 lines of code. Include a timestamp in each notification so you know exactly when the event occurred. Add a configurable cooldown period (30 seconds to 5 minutes) between notifications so you do not receive 47 alerts when someone walks back and forth through a doorway.
-
Add event logging. Log each trigger event with a timestamp to the ESP flash storage (SPIFFS or LittleFS) or an SD card module. Over days and weeks, patterns emerge — when triggers happen, how frequently, whether they correlate with specific times or events. This data lets you distinguish between a cat walking through the beam at 3 AM and an actual person checking your workshop door.
-
Add external device triggers (optional). Wire a relay module to a digital output to control external devices when the alarm fires. Turn on a floodlight to startle intruders. Start recording on a network camera. Activate a sprinkler for comedic deterrent value. Trigger a very loud siren for maximum drama. The relay adds $2 to the build but opens up a world of automated responses. For a garden deer deterrent, a relay-activated sprinkler valve is devastatingly effective.
-
Tune for long-term reliability. Test the system at different times of day — ambient light levels change dramatically between morning sun and nighttime, and these affect the sensor baseline reading. Test with doors and windows open versus closed, since air currents can gradually shift mirror alignment over hours. Add a self-calibration routine in software: periodically re-read the "beam on" baseline value and automatically adjust the threshold. This makes the system resilient to slow environmental changes without manual recalibration.
⚠️ Safety Notes
- Even cheap laser pointers can cause eye damage with direct exposure. Mount the laser so the beam path is below knee level or above head height — never at eye level. If using mirrors, verify that no reflected beam accidentally points toward where someone might be sitting or standing. Check this from multiple positions in the room.
- If using an infrared laser for invisible operation, remember that invisible does not mean safe. IR lasers cause the same retinal damage as visible ones, but without the protective blink reflex that visible light triggers. Use extra caution during alignment — wear IR-blocking safety glasses if available, or use a phone camera to visualize the beam (most phone cameras can detect near-IR).
- Secure all laser and mirror mounts so they cannot shift and redirect the beam unexpectedly. A mirror mount that falls redirects the beam to an unpredictable location.
- If wiring a relay to control mains-powered devices (lights, sirens), follow proper electrical safety practices. The relay must be rated for the load voltage and current. Mains wiring should be properly insulated and enclosed. If you are not comfortable with mains voltage, stick to low-voltage devices.