#271 — Motorized Laser Spirograph
Two mirrors, two motors, one laser, infinite patterns. Add fog and prepare to lose an hour staring at the ceiling.
Ratings
🧪 What Is It?
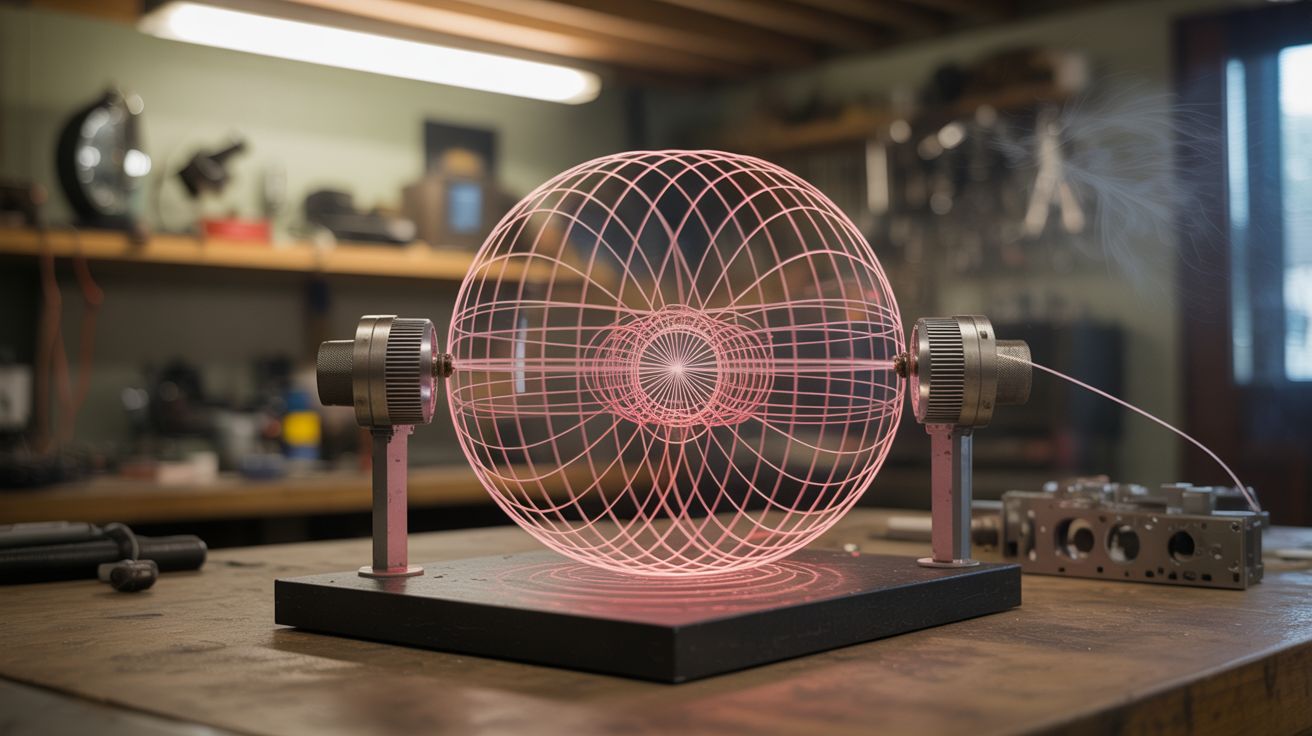
Remember spirographs? Those plastic gear sets that drew hypnotic geometric patterns with a pen? This is the same mathematical principle — Lissajous curves and epicycloid patterns — except drawn on your ceiling with a laser at the speed of light. Instead of interlocking gears, two small mirrors spin on motors at different speeds. The laser bounces off the first mirror, then the second, then hits the ceiling or wall. Each mirror deflects the beam in one axis. Because the mirrors spin at different speeds, the two deflections combine into endlessly evolving geometric patterns that never quite repeat.
The math is the same as a spirograph: if the ratio of the two motor speeds is a simple fraction (2:1, 3:2), you get a clean, closed pattern — a figure-eight, a trefoil, a star. If the ratio is irrational (or close to it), the pattern slowly drifts and never closes, producing ever-evolving curves that are genuinely mesmerizing to watch. Adjust the speed of either motor with a potentiometer and the pattern morphs smoothly from one shape to another in real time.
This is one of the simplest builds in the laser lab — two motors, two mirrors, one laser, done. No microcontroller, no code, no complex optics. Just physics, persistence of vision, and the kind of result that makes people walk into a room and forget what they came in for. In fog, the beam traces become visible in three dimensions, and the effect goes from impressive to transcendent. This build has the best effort-to-spectacle ratio of anything in the entire collection.
🧰 Ingredients
- Laser pointer or laser module — green (532nm) is most visible, red works fine (dollar store, electronics supplier, $2-5)
- 2 small DC motors — different RPM ratings for immediate speed ratio variety (salvage from toys, CD drives, small fans, free)
- 2 small mirrors — 1-2 cm square or round, glued flat to motor shafts (craft store, salvaged from makeup compact or hard drive platter, $1-2)
- 2 motor speed controllers — potentiometer + TIP120 transistor or MOSFET for each motor, or PWM motor driver modules (electronics supplier, $2-3 total)
- Power supply — batteries (4xAA pack) or USB for motors, button cells or batteries for laser (junk drawer, free)
- Mounting board or base — wood, thick cardboard, or acrylic to hold everything in fixed position (scrap bin, free)
- Hot glue or cyanoacrylate — for mirror attachment and motor mounting (junk drawer, $1)
- Fog machine, incense, or haze source — to make beams visible in three dimensions (party store $15, or incense sticks $3)
🔨 Build Steps
-
Mount the first motor and mirror. Secure a small DC motor to your base board with hot glue, screws, or a bracket. The motor should be firmly fixed with no wobble. Glue a small mirror flat onto the end of the motor shaft using cyanoacrylate. When the motor spins, the mirror rotates and deflects any beam hitting it in a circular sweep pattern. The mirror should be as centered on the shaft as possible to minimize wobble, but perfect centering is not critical — slight offset actually adds an interesting orbital component to the pattern.
-
Mount the second motor and mirror. Position the second motor so that the reflected beam from the first mirror hits the second mirror. The second motor should be oriented at roughly 90 degrees to the first — this gives you independent deflection in two perpendicular axes, which is what creates two-dimensional patterns instead of just a spinning circle. Glue a mirror to this shaft the same way. The beam path is: laser -> mirror 1 -> mirror 2 -> ceiling or wall.
-
Position the laser. Mount the laser pointer or module so its beam hits the center of mirror 1. Clamp it, tape it, or hot-glue it to the base board. It needs to stay aimed at the first mirror without drifting. The laser does not need to be precisely centered on the mirror, but it should hit the reflective surface across the full rotation range. If the beam falls off the mirror at certain angles, the pattern will have gaps.
-
Align the beam path. With both motors stationary, manually rotate each mirror by hand to find positions where the beam successfully completes the full path: laser -> mirror 1 -> mirror 2 -> target surface. You may need to tilt the motors at slight angles to get the geometry to work. The final projected beam should hit the ceiling or a wall — not another object, not a window, and definitely not eye level. Once the alignment works at all mirror positions, you are ready to spin.
-
Wire the motor speed controls. Connect each motor through its own speed control circuit. The simplest: a potentiometer connected to the base of a TIP120 transistor (or gate of a MOSFET), with the motor between the transistor output and the power supply. Each motor gets its own potentiometer for independent speed adjustment. Alternatively, use small PWM motor driver modules — they are cleaner and more linear. The key requirement is that each motor has its own smooth, independent speed dial.
-
Power on and observe. Start both motors at low speed. The laser dot on the ceiling should begin tracing a wobbly path. As you increase speed on both motors, persistence of vision kicks in and the path appears as a continuous glowing line. The shape of the line depends on the speed ratio between the two motors. At identical speeds, you get a circle or ellipse. At slightly different speeds, the pattern starts to wander and evolve.
-
Experiment with speed ratios. This is where the build becomes addictive. At a 2:1 motor speed ratio, you get a figure-eight (the simplest Lissajous curve). At 3:2, a trefoil. At 4:3, a four-lobed pattern. At ratios very close to but not exactly simple fractions, the pattern slowly rotates and evolves over time, tracing slightly different paths on each revolution, never quite repeating. Slowly turning one potentiometer while the other stays fixed produces smoothly morphing geometric transformations that are genuinely hypnotic. You will lose 30 minutes to this. Everyone does.
-
Add fog for the full three-dimensional effect. Turn off all the lights in the room. Fill the space with fog (fog machine for dense effect), haze (incense for subtler ambiance), or any particulate that makes laser beams visible. The laser beam becomes a bright, glowing line tracing through the fog. The flat 2D pattern on the ceiling now has depth and volume as the beam arcs through the foggy air between the mirrors and the projection surface. This is the moment where the $5 build starts looking like a $5,000 art installation. Green lasers at 532nm are the most visible in fog.
-
Try variations and expansions. Tilt one or both motors to different angles from vertical — this changes the pattern family from Lissajous curves to more complex epicycloid shapes. Add a third motor and mirror for three-axis deflection — the beam now traces shapes in three dimensions through the fog, creating volumetric patterns that are genuinely unlike anything you have seen before. Swap between red and green lasers for different visual moods. Mount the motors on soft rubber pads or springs so that vibration adds an organic, breathing quality to the patterns. Replace the flat mirrors with slightly curved mirror fragments for distorted, swooping patterns.
-
Build a display-quality version. For a permanent installation or party piece, mount everything in a clean enclosure — a wooden box with a window or an open-top pedestal. Route wires internally. Add a single power switch. Label the two speed knobs. Mount it aimed at a ceiling or wall. The result is a self-contained, plug-and-play light show that anyone can operate by turning two dials. It makes an excellent conversation piece, party prop, or meditation device.
⚠️ Safety Notes
- The laser beam sweeps unpredictably through the room as the mirrors spin. Ensure all beam paths stay above head height by aiming the final reflection at the ceiling. Never aim the projection at eye level or toward areas where people sit or stand.
- Secure the laser mount so it cannot fall or shift during operation. A loose laser that points horizontally sweeps a beam across the room at face height — a genuine hazard.
- Spinning mirrors can detach from motor shafts, especially at higher speeds. Use strong adhesive and visually inspect the bond before each use. Keep your face well away from the spinning mirrors during operation. Start at low speed and increase gradually.
- Fog machines can trigger smoke detectors and building fire alarms. Disable nearby detectors during use and re-enable them immediately when done. Close windows to keep fog density up and to prevent false alarms in neighboring spaces.
- If using green laser modules above 5mW, wear appropriate laser safety goggles during setup and alignment. Once the show is running and you are behind the projector looking at the projection surface (not into the beam), goggles are less critical but still recommended.