#023 — UV Reactive Water Wall
UV LEDs, fluorescent dye, and flowing water combine into a wall of glowing liquid that looks like it belongs in a sci-fi movie.
Ratings
🧪 What Is It?
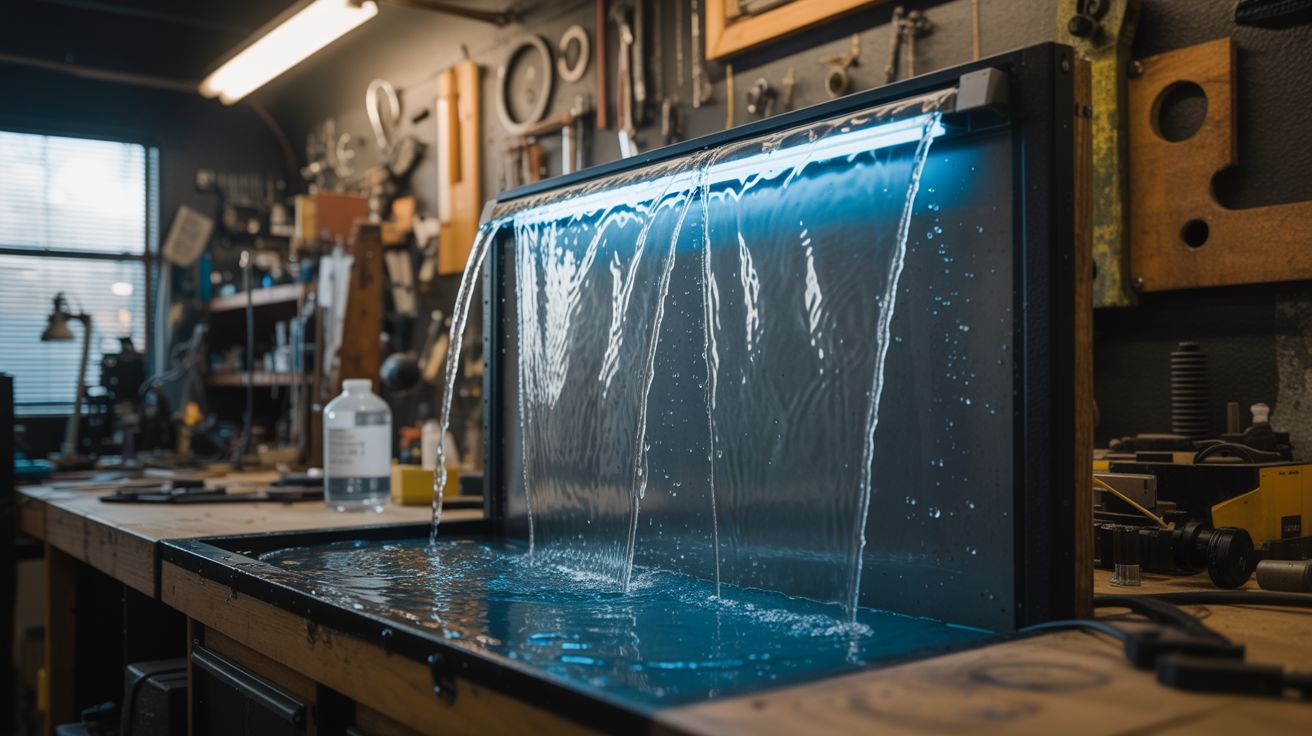
A thin sheet of water flows down a clear surface (acrylic or glass panel) while UV LED strips illuminate it from the edges. Fluorescent dye mixed into the water absorbs the UV light and re-emits it as visible light, making the water glow intensely — bright green with fluorescein, bright blue with optical brightener, or vivid orange with rhodamine. The result is a wall of luminous, flowing liquid that glows without any visible light source.
The glow is genuine fluorescence — the dye molecules absorb UV photons and emit lower-energy visible photons. It's the same physics behind black-light posters, but in liquid form flowing down a wall. In a dark room, it looks absolutely alien. It's also surprisingly easy to build and uses non-toxic materials (fluorescein is used in eye exams, and optical brightener is in laundry detergent).
🧰 Ingredients
- Clear acrylic or glass panel, 2-4 feet tall (source: hardware store or window salvage, ~$10-15)
- UV LED strip (395-405nm blacklight) (source: online, ~$8-12)
- Fluorescent dye — fluorescein (green), optical brightener/stilbene (blue), or highlighter ink (yellow/green) (source: highlighter pens for free, or fluorescein powder online ~$5)
- Small submersible water pump (source: old fountain, aquarium, or online, ~$5-8)
- Plastic tubing for water circulation (source: hardware store, ~$3)
- Catch basin / water trough at bottom (source: shallow storage container or rain gutter, ~$5)
- Distribution bar at top (pipe with small holes or a weir) (source: PVC pipe from hardware store, ~$3)
- Silicone sealant (source: hardware store, ~$5)
- 12V power supply for UV LEDs and pump (source: old laptop charger, free-$5)
🔨 Build Steps
-
Build the frame. Construct a vertical frame to hold the clear panel. The panel should be slightly tilted back from vertical (5-10 degrees) so water flows down the face instead of dripping away from the surface. Add a catch basin at the bottom — a shallow trough or container that collects the water for recirculation.
-
Install the distribution bar. At the top of the panel, mount a horizontal pipe with a row of tiny holes (or a narrow slot) that distributes water evenly across the full width of the panel. The water needs to flow as a uniform sheet, not individual streams. A PVC pipe with holes drilled every 1/4 inch works, or a 3D-printed weir.
-
Set up the pump loop. Place the submersible pump in the catch basin at the bottom. Connect tubing from the pump output to the distribution bar at the top. When running, the pump recirculates the same dye water continuously — it flows down the panel, collects in the basin, pumps back up, and flows down again.
-
Install UV LED strips. Mount UV LED strips along the edges of the clear panel — top, bottom, or sides. Edge-mounting works best because the UV light enters the panel and illuminates the water from within. For panels thicker than 1/4 inch, you can also mount strips behind the panel. The UV should illuminate the water without being directly visible to the viewer.
-
Mix the fluorescent solution. Fill the catch basin with water. For green glow: crack open 2-3 yellow highlighter pens and soak the felt inserts in the water (or dissolve a pinch of fluorescein powder). For blue glow: dissolve a tablespoon of laundry optical brightener. The solution doesn't need to be strongly concentrated — a little goes a long way.
-
Test the flow. Turn on the pump and adjust the flow rate so water sheets evenly down the panel surface. Too much flow and it splashes. Too little and it forms rivulets instead of a sheet. The distribution bar may need adjustment — seal some holes or enlarge others to even out the flow.
-
Light it up. Kill the room lights and turn on the UV LEDs. The flowing water should glow intensely across the entire panel. The combination of flowing motion and fluorescent glow creates a mesmerizing, living light effect. Adjust UV strip positioning for the most even illumination.
-
Fine-tune. Add more dye if the glow is faint. Reposition LED strips if there are dark spots. Add a dimmer to the UV strip power for mood control. For extra effect, add a small amount of a second dye color to get gradient effects where they mix.
⚠️ Safety Notes
[!WARNING] Fluorescein and optical brighteners are generally non-toxic but can stain. Fluorescein in particular will stain clothing, countertops, and grout bright yellow-green. Work over a drop cloth during setup. Wear old clothes. If it gets on skin, it washes off with soap and water but may take a few washes.
- UV LEDs can irritate eyes with prolonged direct exposure. Don't stare directly into the LED strips. Position them so the UV light hits the water, not viewers' eyes. 395-405nm LEDs (near-UV) are safer than shorter wavelength UV, but extended direct exposure is still inadvisable.
- Water + electricity. Make sure all electrical connections (pump, LED strips, power supply) are properly insulated and positioned so splashes can't reach them. Use a GFCI outlet. Keep the power supply well above the water level.
🔗 See Also
- UV Mineral Display — UV light revealing hidden fluorescence in natural minerals
- Infinity Mirror Table — another LED-based installation that transforms a space