#038 — Electromagnetic Levitator
A feedback-controlled electromagnet holds an object floating in mid-air. No strings. No tricks. Just a magnet, a sensor, and a control loop.
Ratings
🧪 What Is It?
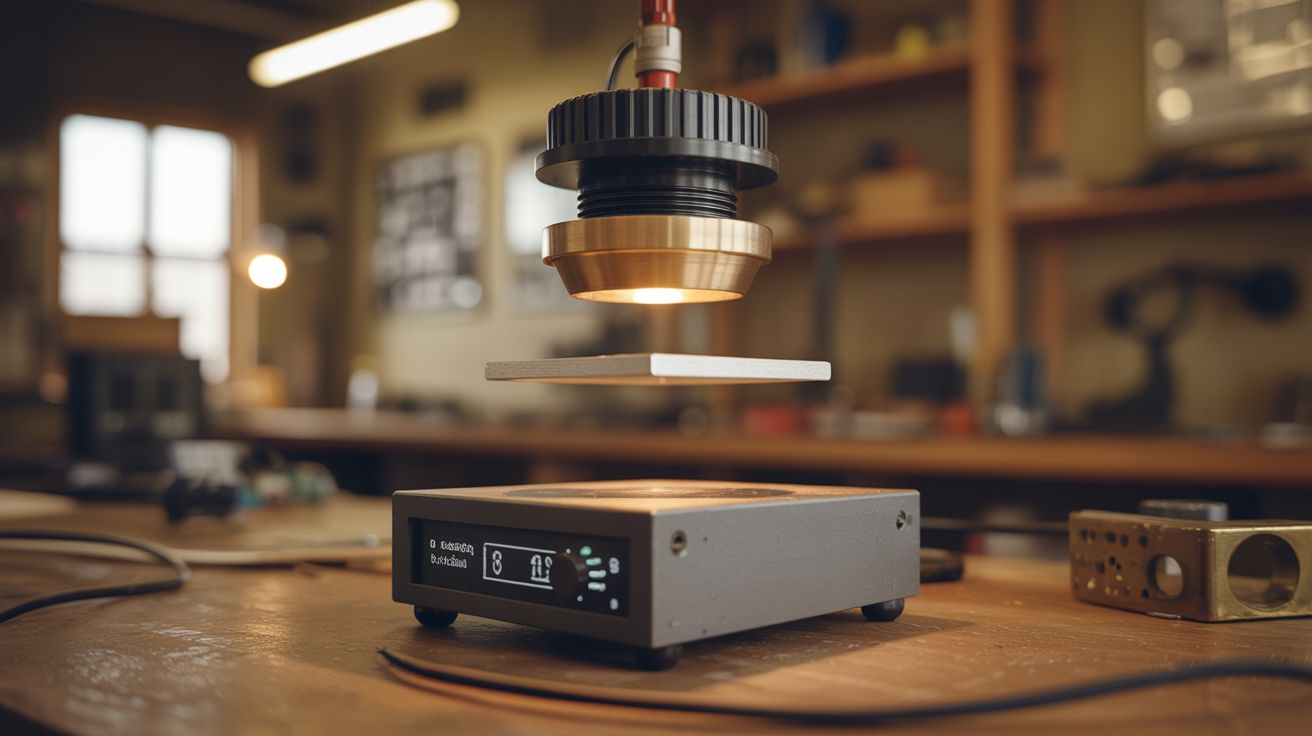
Electromagnetic levitation works on a beautifully simple principle that's devilishly hard to execute. An electromagnet above an object pulls it upward. A sensor (usually a Hall effect sensor) measures the object's position. A control circuit adjusts the electromagnet's current in real time — if the object drops too far, increase current to pull harder; if it rises too close, decrease current to let gravity pull it back. The object hovers in the balance point between gravity pulling down and the magnet pulling up.
The control loop runs thousands of times per second. Without feedback, the system is inherently unstable — the magnet either grabs the object and slams it against the coil, or lets it drop. But with a properly tuned PID controller (proportional-integral-derivative), the object hangs motionless in space. It's one of the most mesmerizing things you can build, and one of the best introductions to control theory.
🧰 Ingredients
- Electromagnet — wound from magnet wire around an iron bolt or soft iron core (hardware store, electronics supplier)
- Hall effect sensor — analog output (e.g., SS49E or A1302) (electronics supplier, ~$2)
- Op-amp or microcontroller — for the PID controller (analog or digital) (electronics supplier)
- MOSFET — to drive the electromagnet coil (IRFZ44N or similar) (electronics supplier, ~$2)
- Power supply — 12V-24V DC, 2A+ (old laptop charger)
- Flyback diode — across the electromagnet coil (electronics supplier)
- Potentiometers — for tuning PID gains (electronics supplier)
- Object to levitate — small neodymium magnet, steel ball bearing, or small ferromagnetic object (hardware store)
- Frame/stand — to hold the electromagnet above the levitation point (scrap wood or metal)
- Perfboard or PCB (electronics supplier)
🔨 Build Steps
- Wind the electromagnet. Wrap 200-400 turns of 20-24 AWG magnet wire around a 3/8"-1/2" iron bolt. More turns = stronger field but more resistance. A bolt about 3" long with a 1" wide head works well — the flat head provides a broad attraction surface. Leave leads for wiring.
- Mount the electromagnet. Build a frame that holds the electromagnet pointing downward with the head about 2-3 inches above the table surface. The frame must be rigid — any flex defeats the control loop. A wooden or metal bracket clamped to a shelf or stand works.
- Install the Hall sensor. Mount the Hall effect sensor directly below the electromagnet, either on the bottom face of the magnet core or on a small bracket just below it. The sensor detects the magnetic field of the levitating object and provides the feedback signal for position control.
- Build the analog PID controller. Using op-amps (LM358 or LM324): the sensor signal goes to a comparator that compares it with a setpoint (from a potentiometer). The error signal feeds through proportional, integral, and derivative stages, whose outputs sum and drive the MOSFET gate. This is the classic analog levitation circuit — dozens of schematics exist online.
- Alternatively, use a microcontroller. An Arduino reads the Hall sensor via ADC, computes the PID output in software, and drives the MOSFET via PWM. This is easier to tune (change numbers in code vs. swapping resistors) but requires programming knowledge. Sample rate must be at least 1 kHz for stable levitation.
- Wire the drive circuit. The MOSFET switches current to the electromagnet based on the controller output. Install a flyback diode across the coil (cathode to positive) — without it, the inductive kickback when the MOSFET turns off will destroy it.
- Tune the controller. Start with proportional gain only (I and D set to zero). Slowly increase P gain until the object jitters — it should alternate between pulling up and dropping. Then add derivative gain to dampen the oscillation. Finally, add a small amount of integral gain to eliminate steady-state offset. Tuning is the hardest part — expect to spend an hour adjusting.
- Stabilize and refine. Once the object floats, gently push it sideways — the magnet should pull it back. If it swings wildly, reduce P gain. If it drifts and drops, increase I gain. A well-tuned system will hold an object rock-steady indefinitely with no visible movement.
⚠️ Safety Notes
- The electromagnet gets hot under continuous operation. The wire resistance converts electrical energy to heat. If the coil is warm to the touch, it's fine. If it's too hot to touch, increase wire gauge or reduce duty cycle. An overheating coil can melt its enamel insulation, causing shorted turns and eventual failure.
- Strong neodymium magnets used as the levitating object can pinch fingers severely if they snap to the electromagnet during testing. Handle them carefully and keep fingers clear when the system is powered.
- If using a microcontroller, a software crash drops the object. This is usually harmless but can be startling. Consider adding a physical catch tray below the levitation point, especially if levitating anything breakable.