#290 — Hand-Crank Generator
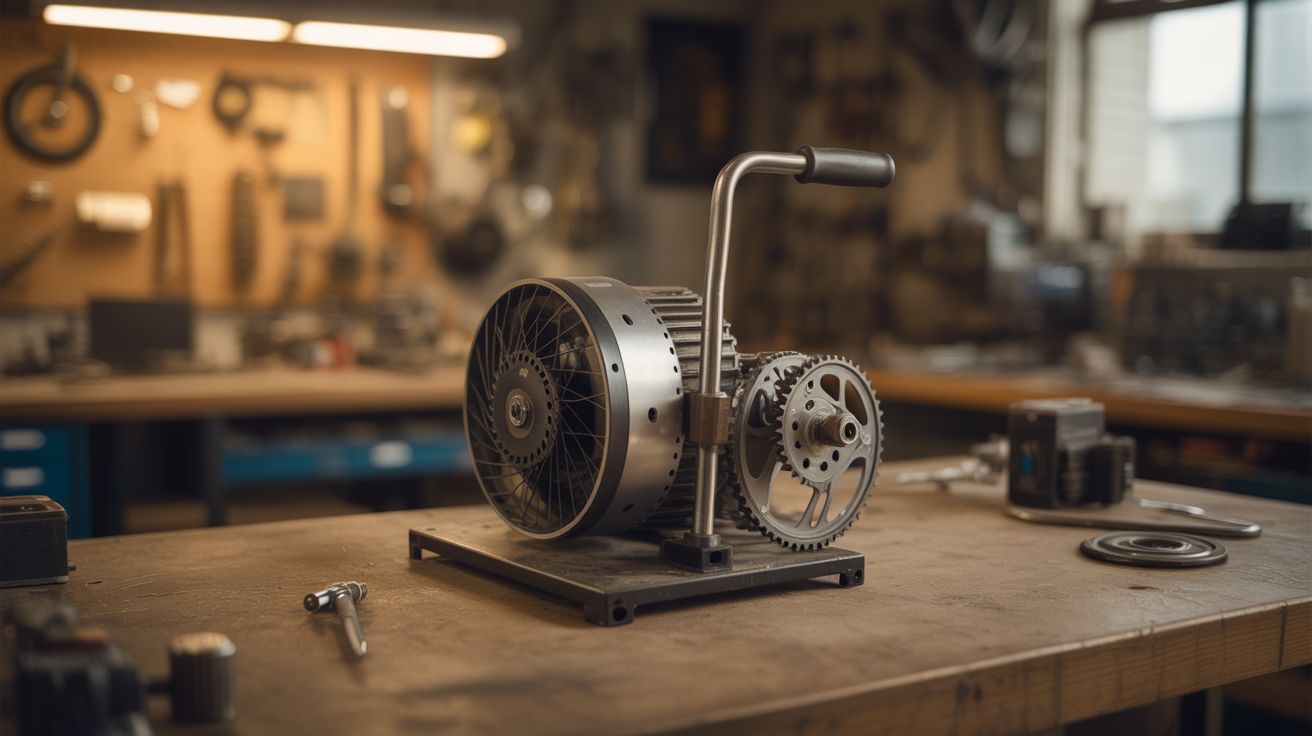
A dead treadmill motor, some bicycle gears, and a crank handle. When the grid goes down, your arm becomes the power plant.
Ratings
🧪 What Is It?
Every DC motor is also a generator. Spin the shaft and it produces voltage proportional to RPM. The problem: the RPM you can produce by hand-cranking is pathetically low compared to what a generator wants. Your arm turns a crank at maybe 60-90 RPM. A treadmill motor produces useful voltage at 1000+ RPM. That's where bicycle gears come in — a gear ratio of 10:1 or 15:1 converts your lazy hand-cranking into generator-appropriate speed, and the motor starts pushing out 12-20V of raw DC power.
Run that through a bridge rectifier to clean up the waveform, then through a buck converter to regulate it down to a steady 5V USB output, and you've got a hand-crank phone charger that produces 5-20 watts depending on how aggressively you're cranking. Five minutes of moderate effort puts about 5-10% charge on a modern smartphone. It's not fast, but when the power's out and your phone is at 2%, it's the most valuable machine in the house.
The treadmill motor is the heart of this build — they're beefy permanent-magnet DC motors designed for continuous duty, and they show up on curbs and at thrift stores constantly because treadmills are the most abandoned piece of exercise equipment in human history. The bicycle gears and chain provide a proven, durable, low-friction drivetrain that handles the speed multiplication. The rest is just voltage regulation and a mounting base. You can build the whole thing in an afternoon from junkyard parts and have a reliable emergency power source that never runs out of fuel as long as you've got one working arm.
🧰 Ingredients
- Treadmill motor / DC motor — permanent magnet type, salvaged from a dead treadmill (curbside, thrift store, gym closeout — treadmills are everywhere)
- Bicycle gears and chain — a large sprocket (40-50 tooth) for the crank and a small sprocket (5-10 tooth) for the motor shaft, plus a matching chain (dead bicycle, bike shop scrap bin)
- Crank handle — a bicycle pedal and crank arm, or fabricate one from steel rod and a handle grip (dead bicycle, hardware store)
- Rectifier bridge — converts AC-like generator output to clean DC (a full-bridge rectifier module or four individual diodes) (electronics supplier, ~$1-$3)
- Voltage regulator — adjustable buck converter, set to 5V USB output (electronics supplier, ~$3-$5)
- Capacitor — 1000-4700uF electrolytic, for smoothing voltage ripple from the generator (electronics supplier, salvage from dead electronics, ~$1)
- USB port — panel-mount USB-A female connector (electronics supplier, ~$2)
- Mounting base — 3/4" plywood, about 12"x18", for bolting everything down (hardware store, scrap pile)
- Bearings — for the crank shaft if not using a bicycle bottom bracket (hardware store, ~$5-$10)
- Bolts, brackets, and hardware — for mounting the motor, bearings, and sprockets to the base (hardware store, ~$5-$10)
🔨 Build Steps
-
Extract the treadmill motor. Remove the motor from the dead treadmill — it's usually bolted to the front roller assembly under the deck. Cut the wires leaving plenty of length. The motor will have two heavy leads (main power) and possibly two thinner leads (speed sensor — ignore these). Test the motor by spinning the shaft by hand while measuring voltage across the main leads with a multimeter. Even a slow hand spin should produce a few volts. If it produces nothing, the permanent magnets may be demagnetized — find a different motor.
-
Set up the gear train. Mount the large sprocket (40-50 tooth) on the crank shaft — this is the input side, where your hand goes. Mount the small sprocket (5-10 tooth) on the motor shaft. The ratio between these two sprockets is your speed multiplication. A 48-tooth sprocket driving a 6-tooth sprocket gives an 8:1 ratio, meaning 80 RPM of hand-cranking becomes 640 RPM at the motor. That's on the low end for useful output — aim for 10:1 or higher if you can find the right sprockets.
-
Build the crank assembly. If using a bicycle crank arm and pedal, mount a bicycle bottom bracket to the plywood base using a fabricated bracket or a section of the bike's frame. The bottom bracket provides sealed bearings and a standard crank arm mount. If building a custom crank, press-fit bearings into pillow blocks bolted to the base, run a steel shaft through them, and weld or pin the large sprocket to one end and a handle to the other. The handle should be comfortable for sustained cranking — a bicycle grip on a perpendicular stub works well.
-
Mount the motor. Bolt the treadmill motor to the base with the small sprocket aligned to the large sprocket. Install the chain. Tension matters — too loose and the chain skips under load, too tight and it binds and wastes your effort. A slotted mounting for the motor lets you adjust tension by sliding it back and forth. Spin the crank and verify the chain drives the motor smoothly without binding or jumping teeth.
-
Wire the rectifier and smoothing capacitor. Connect the motor's output leads to the AC input terminals of the bridge rectifier. The motor produces roughly DC already (it's a DC motor), but the rectifier cleans up any polarity reversals during cranking direction changes. Connect the 1000-4700uF capacitor across the rectifier's DC output terminals — this smooths voltage ripple so the regulator gets a steady input. Observe polarity on the capacitor.
-
Wire the voltage regulator. Connect the rectifier's DC output to the input of the buck converter. Adjust the buck converter's output to exactly 5.0V using its trim pot and a multimeter. Connect the USB port to the buck converter's output. Most buck converters need a minimum input voltage of 7-8V to produce a stable 5V output, so you'll need to crank with enough vigor to keep the generator above that threshold.
-
Test it. Crank at a moderate pace and measure voltage at each stage — raw motor output, post-rectifier, and at the USB port. At a comfortable cranking speed you should see 10-20V raw, 9-19V rectified, and a steady 5V at USB. Plug in a phone and verify it charges. If the phone keeps connecting and disconnecting, the voltage is dipping below the regulator's dropout — crank harder or add more gear ratio.
-
Add a voltage indicator. Mount a small panel-mount voltmeter on the base that shows the raw generator voltage. This gives you real-time feedback on your cranking speed — you can see immediately when you're cranking hard enough to charge and when you're slacking off. Alternatively, wire an LED that lights up when the output voltage is above the charging threshold.
-
Secure and finish. Bolt or screw all components firmly to the base. Route wires neatly and secure them with cable ties away from the chain and sprockets. Add rubber feet to the base so it doesn't walk across the table while cranking. Label the USB port. Sand any rough plywood edges. You want this to feel like a tool, not a prototype — it might actually save you someday.
⚠️ Safety Notes
- Keep fingers, hair, and loose clothing away from the chain and sprockets. The gear ratio means the motor-side sprocket spins fast — a finger caught between chain and sprocket at 1000 RPM will be very unhappy. Consider adding a chain guard fabricated from sheet metal or a plastic enclosure around the drive train.
- The motor can produce voltages well above 5V at the raw output — potentially 30V+ if you crank very fast with no load. The buck converter handles this, but don't touch the raw output terminals while cranking. If you add a battery charging circuit later, include overvoltage protection.
- Treadmill motors are heavy — 10-20 pounds. Mount them securely with proper bolts (not screws) into a base that won't tip. The torque from cranking can walk an unsecured unit right off a table.
- If you later decide to scale this up with a flywheel for energy storage, the flywheel becomes a serious safety concern at speed. That's a different build — don't bolt a heavy spinning mass to this without proper engineering.