#008 — Plasma Speaker
A flyback transformer modulates an electrical arc to play music — the speaker cone is literally lightning.
Ratings
🧪 What Is It?
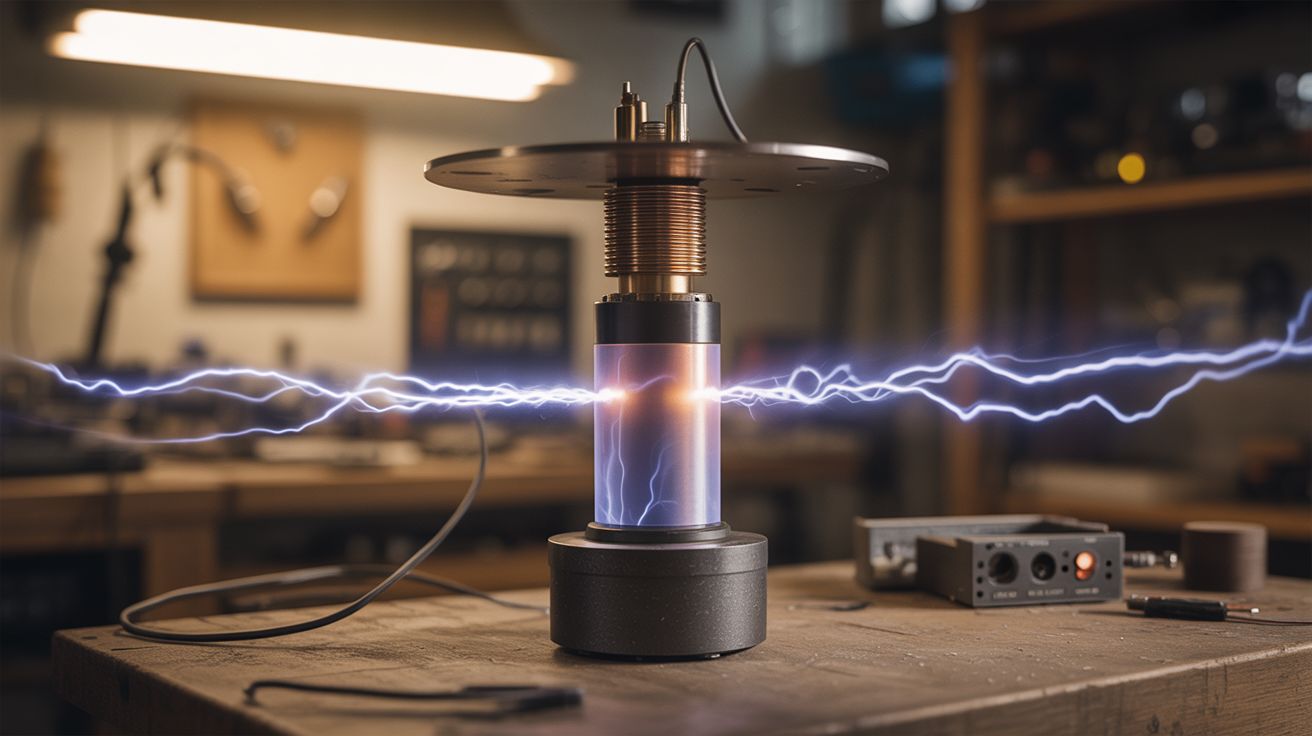
A plasma speaker uses a high-voltage arc (produced by a flyback transformer driven by a simple oscillator circuit) as the sound-producing element instead of a traditional speaker cone. An audio signal modulates the arc's intensity at audio frequencies, and the rapidly expanding and contracting plasma creates pressure waves — sound. The arc is the speaker.
The sound quality is surprisingly good for treble and midrange, though bass is virtually nonexistent (the arc is too small to move enough air for low frequencies). What makes it jaw-dropping is the visual: a bright purple-white arc of electricity dancing and buzzing in time with the music, clearly producing the sound you hear. No speaker cone, no membrane — just raw electricity vibrating the air.
🧰 Ingredients
- Flyback transformer from a CRT TV or monitor (source: dead CRT TV, free from electronics recycler)
- MOSFET transistor — IRFP250 or similar (source: electronics supplier or salvaged power supply, ~$3)
- 555 timer IC or TL494 PWM controller (source: electronics supplier, ~$1)
- Audio input cable (3.5mm aux) (source: old headphone cable, free)
- 12-24V DC power supply, at least 5 amps (source: old laptop charger or ATX power supply, free-$5)
- Resistors, capacitors, diodes for the driver circuit (source: electronics supplier or salvaged boards, ~$3)
- Heatsink for the MOSFET (source: old CPU cooler, free)
- Perfboard or breadboard (source: electronics supplier, ~$3)
- Insulated wire and alligator clips (source: hardware store)
- Pointed electrodes — nails or thick copper wire (source: junk drawer)
🔨 Build Steps
-
Salvage the flyback transformer. Open a dead CRT TV (after discharging the CRT — see safety notes). The flyback transformer is the component with the thick red wire going to the suction cup on the CRT. Desolder or cut it free from the board. Keep the red high-voltage output wire and find the primary pins on the bottom.
-
Identify the flyback primary pins. Using a multimeter on resistance mode, find two pins on the flyback that show low resistance (1-10 ohms). These are the primary winding. The high-voltage output is the red wire (secondary). If the flyback has a built-in diode, you may need to find one with an accessible secondary or use an external fast-recovery diode.
-
Build the driver circuit. Construct a simple self-oscillating or 555-timer-driven circuit that switches the MOSFET on and off at 20-50 kHz, driving the flyback primary. A basic two-transistor feedback oscillator works, or a 555 timer driving the MOSFET gate. There are well-documented schematics online for "flyback driver" circuits — pick one that includes an audio modulation input.
-
Add audio modulation. The audio signal from your phone or computer (via 3.5mm cable) modulates either the 555 timer's frequency or the MOSFET gate signal. The simplest method feeds the audio signal into the 555's control voltage pin (pin 5), which varies the oscillation frequency in time with the music. This AM/FM modulation of the arc produces audible sound.
-
Mount the electrodes. Connect the flyback's high-voltage output (red wire) to one pointed electrode (a nail works). Connect the flyback's ground return to a second pointed electrode positioned 5-15mm away. The arc will jump between these two points. Mount them on an insulated stand so you can adjust the gap.
-
Add a heatsink. The MOSFET will get hot. Mount it on a salvaged CPU heatsink with thermal paste. If you're running at higher power levels, add a small fan.
-
Power up without audio. Connect your DC power supply, turn it on, and verify you get a stable arc between the electrodes. Adjust the electrode gap — too far and the arc won't strike; too close and it's just a dull buzz. You want a bright, crackling arc about 5-10mm long.
-
Connect audio and play music. Plug your phone or audio source into the 3.5mm input. Play a song with clear vocals and midrange (electronic music and vocals work best). You should hear the music emanating from the arc itself. The arc will visibly change character with the music — brighter during loud parts, thinner during quiet parts.
-
Tune the sound. Adjust the base oscillation frequency, electrode gap, and audio input volume. Higher base frequencies generally produce clearer audio. Too much audio input overmodulates and sounds distorted. Find the sweet spot where the music is clear and the arc is stable.
⚠️ Safety Notes
Spicy Level 4 build. Read the Safety Guide before starting.
[!CAUTION] CRT discharge is mandatory before salvage. CRT tubes hold lethal charge (up to 25,000V) for weeks or months after being unplugged. Before opening any CRT TV, discharge the anode cap to chassis ground using an insulated screwdriver with a wire clipped to the TV's chassis ground. Do this multiple times to be sure.
- The flyback output is high voltage (5,000-30,000V). While the current is relatively low, it can still cause painful shocks and burns. Never touch the electrodes or high-voltage wire while the circuit is powered. Keep one hand in your pocket when making adjustments near the high-voltage side.
- Ozone production. The electrical arc produces ozone (O3), which is toxic in concentration. Run the plasma speaker in a well-ventilated area. If you smell a sharp, metallic/electrical smell, you're breathing ozone — increase ventilation.
🔗 See Also
- Plasma Tornado Lamp — plasma as visual art instead of audio
- Rubens' Tube — another way to visualize sound, using fire instead of plasma