#054 — Vacuum Plasma Cloud Chamber
A cloud chamber inside a vacuum system with plasma discharge. Watch particle tracks illuminate inside a glowing plasma field. Three physics experiments combined into one impossible display.
Ratings
🧪 What Is It?
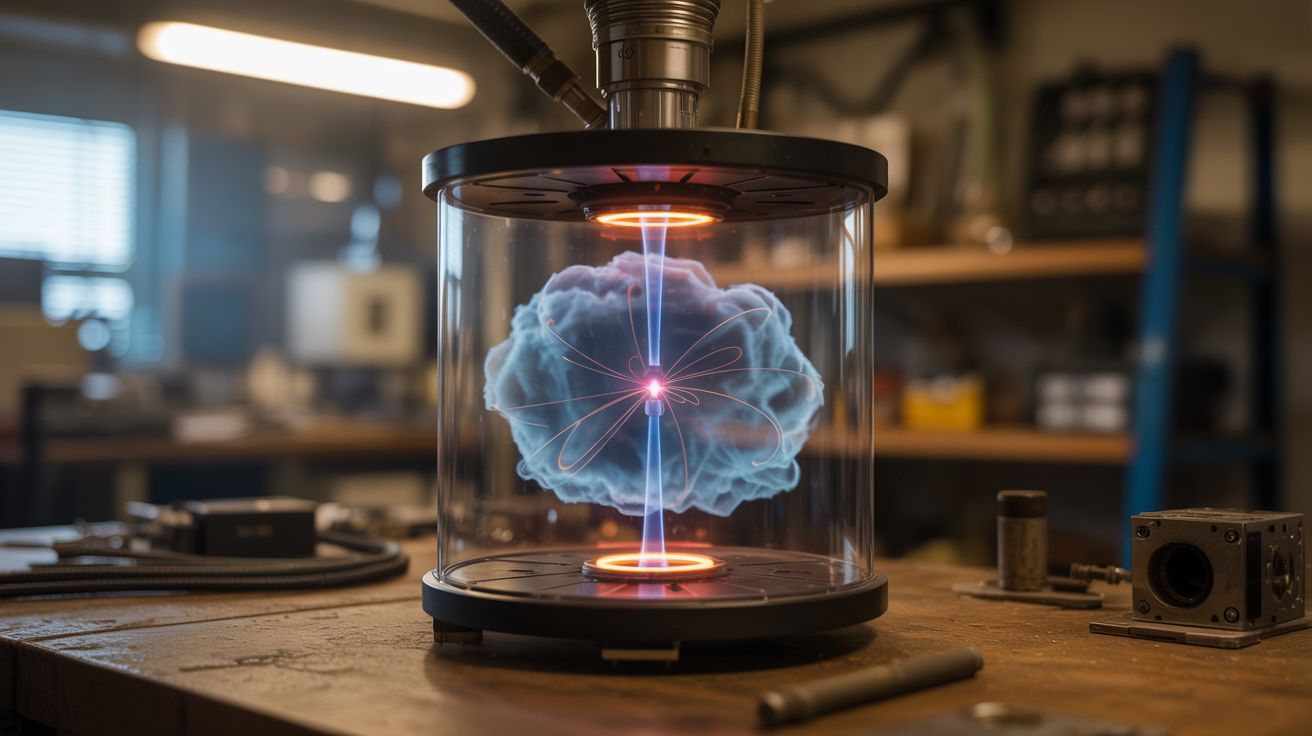
A standard cloud chamber (build #041) works at atmospheric pressure. This build takes it further: place the cloud chamber inside a partial vacuum, then add a low-pressure plasma discharge. At reduced pressure, the alcohol vapor supersaturation zone is larger and more uniform. The plasma discharge (a glow discharge in the low-pressure gas) illuminates the entire chamber with an eerie purple-blue glow. Particle tracks cut through the plasma like bright white lines through a neon sign.
The combination is more than aesthetic — the reduced pressure actually improves cloud chamber performance. At lower pressure, the mean free path of particles increases, meaning particle tracks are longer and more defined. The plasma glow provides built-in illumination that's more uniform than any external light source. And the visual effect is spectacular: cosmic ray tracks slicing through a glowing purple gas, with alpha particle starbursts from radioactive sources creating bright white explosions in the plasma.
This build requires a functioning vacuum chamber (build #039), cloud chamber expertise (build #041), and comfort with high-voltage plasma generation. It's the intersection of three demanding builds.
🧰 Ingredients
- Vacuum chamber — with viewport, from build #039 (see Vacuum Chamber)
- Vacuum pump — capable of reaching 10-50 Torr (not full vacuum — you need residual gas for the plasma and cloud operation) (fridge compressor or rotary vane pump)
- Peltier cooler or dry ice — for the cold plate inside the chamber (electronics supplier, or grocery store)
- Isopropyl alcohol 99% — for the supersaturated vapor (pharmacy)
- Felt strip — alcohol reservoir inside the chamber (craft store)
- High-voltage DC supply — 500V-2kV, variable, for the glow discharge (flyback driver or dedicated supply)
- Electrode plates — two parallel plates inside the chamber for the plasma discharge (aluminum or stainless steel, cut to fit)
- Vacuum feedthrough connectors — for HV and cooling power into the chamber (lab supply, or DIY epoxy feedthroughs)
- Radioactive source (optional) — Am-241 from smoke detector, or thoriated welding rod (hardware store)
- Pressure gauge — capable of reading 1-100 Torr range (HVAC supplier, lab supply)
- Needle valve — for fine pressure control (hardware store, HVAC)
🔨 Build Steps
- Modify the vacuum chamber. Install vacuum feedthroughs for: high-voltage wires (to the plasma electrodes), low-voltage wires (to the Peltier cooler if using one), and optionally a viewport window if the chamber doesn't already have one. The feedthroughs must hold vacuum — use proper vacuum epoxy or commercial feedthrough fittings.
- Install the cold plate. Mount a Peltier cooler (or a metal plate that contacts dry ice from outside the chamber) at the bottom of the chamber. This creates the cold surface that drives the supersaturation. The Peltier's hot side needs a heatsink, which can be the chamber wall itself if it's metal.
- Install the alcohol reservoir. Attach a felt strip near the top of the chamber interior, saturated with 99% isopropyl alcohol. In the sealed chamber, the alcohol will evaporate from the warm top and condense at the cold bottom, creating a supersaturation zone — same principle as the standard cloud chamber, but in a controlled environment.
- Install the plasma electrodes. Mount two parallel metal plates vertically inside the chamber, flanking the cloud region. These will sustain a glow discharge when high voltage is applied. Space them 2-4 inches apart. Connect them to the HV feedthroughs.
- Seal and pump down. Close the chamber and begin evacuating. Monitor the pressure gauge. You need a partial vacuum — roughly 10-50 Torr — not full vacuum. At this pressure, a glow discharge can sustain in the residual air/alcohol vapor, and the cloud chamber physics still works. Use the needle valve to fine-tune the pressure.
- Initiate the plasma. Apply high voltage across the electrodes. Start at 500V and increase slowly. At the right pressure and voltage, a glow discharge will form — the gas between the plates glows purple-blue. This is a Townsend discharge. If the discharge is too bright or constricts into an arc, reduce voltage or increase pressure.
- Verify cloud chamber operation. With the cold plate active and the alcohol reservoir saturated, you should see a fog layer forming near the cold plate inside the plasma glow. Watch for particle tracks — they appear as bright condensation trails cutting through the illuminated vapor. Cosmic ray tracks will be dramatic straight lines. Alpha tracks from a source will be short bright bursts.
- Optimize the pressure. The ideal pressure balances two competing requirements: low enough for long particle tracks and stable plasma, high enough for adequate alcohol vapor density and cloud formation. Adjust the needle valve while watching for tracks. The sweet spot is usually 20-40 Torr.
- Document and observe. The visual effect is unlike anything else in this book. Particle tracks illuminated by plasma glow are vivid and otherworldly. A camera set to long exposure captures the tracks beautifully against the purple plasma background.
⚠️ Safety Notes
Spicy Level 4 build. Read the Safety Guide before starting.
- The high-voltage plasma discharge is dangerous. At 1-2kV, the electrodes can deliver a serious shock. All HV connections must be inside the sealed chamber or behind insulated feedthroughs. Interlock the HV supply so it cuts automatically when the chamber is opened. Never reach into the chamber while HV is applied.
- The vacuum chamber is under mechanical stress from atmospheric pressure. All safety notes from build #039 apply. The addition of HV feedthroughs creates potential weak points — test vacuum integrity before applying high voltage.
- Alcohol vapor inside the chamber is flammable. The plasma discharge is a potential ignition source. At the low pressures involved, the risk is reduced (flames don't propagate well below ~100 Torr), but exercise caution when venting the chamber — the vapor concentration increases as pressure rises. Vent slowly, outdoors if possible.