#283 — Plasma Speaker Lamp
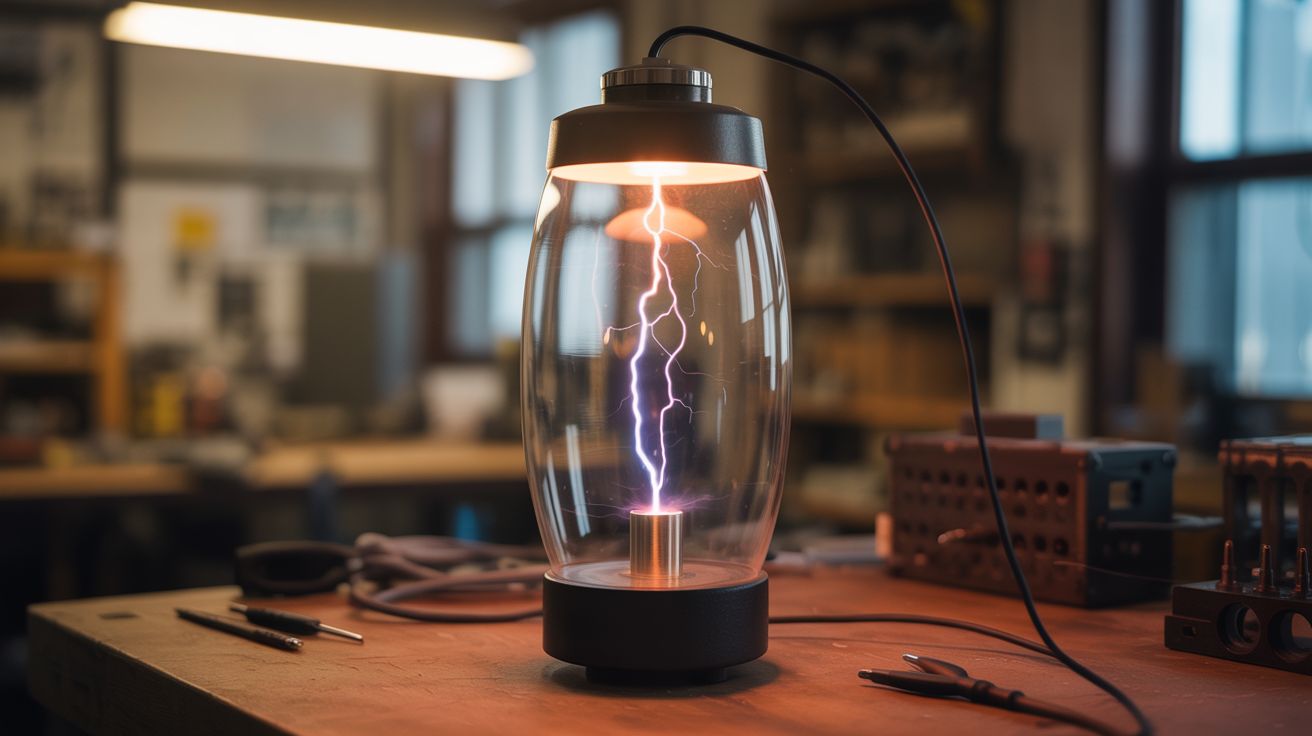
A lamp that plays music through lightning. The arc IS the speaker — heated air molecules vibrate at audio frequencies, producing sound from pure electricity inside a glass enclosure.
Ratings
🧪 What Is It?
A flyback transformer salvaged from a dead CRT television drives a high-voltage plasma arc between two electrodes inside a glass lamp housing. An audio signal modulates the arc's intensity at audible frequencies. The rapid heating and cooling of air molecules around the arc creates pressure waves — sound — directly from the plasma itself. No speaker cone, no magnet, no membrane. The lightning is the speaker.
Plasma speakers have near-zero mass in their "driver element" (the arc weighs nothing), which means the frequency response is remarkably flat compared to conventional speakers. There's no cone breakup, no resonant peaks, no crossover distortion. The physics are elegant: the arc creates a column of superheated air at roughly 6,000°C. Modulate the power fed to that arc at 440 Hz, and the air column expands and contracts 440 times per second. You get a perfect 440 Hz tone radiating omnidirectionally from a point source of literal fire.
This build wraps that plasma speaker in a decorative glass lamp housing — a mason jar, bell jar, or vintage glass insulator — turning it into a functional art piece. Set it on a shelf, plug in your phone, and watch visitors lose their minds when they realize the music is coming from a tiny bolt of lightning inside a lamp. The arc flickers and dances with the beat, brighter on loud passages, dim during quiet moments. It's a conversation piece that actually works as a speaker for mids and highs (you'll still want a subwoofer for bass).
🧰 Ingredients
- Flyback transformer — the high-voltage transformer from a CRT TV or monitor (dead CRT TV from e-waste, free)
- Audio amplifier module — Class D, 10-50W, with analog input (electronics supplier, ~$5-$10)
- MOSFET — IRFP250N or similar, N-channel, rated for 200V+ and 30A+ (electronics supplier, ~$3)
- Gate driver IC — IR2110 or TC4420, to drive the MOSFET hard and fast (electronics supplier, ~$2)
- 12-24V power supply — 3A minimum, bench supply or laptop charger (salvage or electronics supplier, ~$10)
- Arduino Nano — for generating the PWM carrier signal (electronics supplier, ~$5)
- 3.5mm audio input jack — panel-mount (electronics supplier, ~$1)
- Glass lamp housing — mason jar, bell jar, or large glass insulator with open bottom (thrift store, ~$5-$10)
- Electrodes — tungsten TIG welding rods work best, 1/16" diameter (welding supplier, ~$5 for a pack)
- Heat-resistant base — ceramic tile or fire brick, 6"x6" minimum (hardware store, ~$3)
- Hookup wire — 18 AWG silicone-insulated for high-current paths, 22 AWG for signal (electronics supplier, ~$5)
- Heatsink — small aluminum heatsink for the MOSFET (electronics supplier or salvage, ~$2)
- Audio cable — 3.5mm male-to-male (already own)
🔨 Build Steps
-
Extract the flyback transformer. Crack open the CRT TV case (discharge the tube first — see Safety Notes). Locate the flyback transformer on the PCB. It's the largest transformer, usually near the back of the tube with a thick red wire going to the CRT's anode cap. Desolder or clip it free. You need the ferrite core with its windings intact. Don't worry about the original drive circuit — you're building your own.
-
Build the driver circuit. The flyback needs a high-frequency switching signal to generate high voltage. Wire the MOSFET drain to one end of the flyback's primary winding. The other end of the primary goes to your 12-24V supply positive. MOSFET source goes to ground. The gate driver IC sits between the Arduino's PWM output and the MOSFET gate, providing the current needed to switch the MOSFET at high speed. Add a 10-ohm gate resistor to control ringing.
-
Program the carrier signal. Load the Arduino with a sketch that generates a 20-40 kHz PWM signal on one output pin. This is the carrier frequency — it drives the flyback at its resonant frequency to produce the arc. Start at 20 kHz and sweep upward while monitoring the flyback output (from a safe distance). You'll find a resonant peak where the arc jumps strongest. Lock in that frequency. The exact value depends on your specific flyback's winding characteristics.
-
Add audio modulation. Feed the audio signal from the 3.5mm jack into the Arduino's analog input (through a voltage divider to keep it within 0-5V). In the Arduino code, read the audio amplitude and use it to modulate the PWM duty cycle. Higher audio amplitude = higher duty cycle = brighter/louder arc. The carrier frequency stays constant; only the duty cycle (envelope) changes. This is AM modulation of the plasma arc. The audio update rate should be as fast as possible — use direct ADC reads, not analogRead(), to hit 40 kHz+ sample rates.
-
Set up the electrodes. Mount two tungsten electrodes on the heat-resistant base, pointing at each other with a 5-15mm gap between the tips. Tungsten is critical — steel or copper electrodes will erode within minutes. Tungsten survives the plasma temperatures. Secure them with ceramic standoffs or simply drill them into the fire brick. Connect the flyback's high-voltage output to one electrode. Ground the other electrode back to the circuit ground through the power supply's negative terminal.
-
Test the bare arc. Power on the driver without audio input. You should see a plasma arc jump between the electrode tips. If not, reduce the gap. If the arc is unstable or weak, adjust the carrier frequency. Once you have a steady arc, connect your phone and play music. You should hear recognizable audio emanating from the arc itself — tinny and mid-heavy, but clearly music. Adjust the modulation depth in the Arduino code until the sound is clear without the arc extinguishing on quiet passages.
-
Build the lamp enclosure. Mount the electrode assembly on the heat-resistant base. Place the glass housing over the electrodes — the jar or bell jar sits inverted on the base, creating an enclosed display. The glass must NOT be sealed airtight — the arc produces ozone and nitrogen oxides that need to vent. Leave a small gap at the base, or drill a few small vent holes in the base. Route the wires out through the base.
-
Final assembly and tuning. Hide the driver circuit and Arduino inside or behind the base. The visible portion should look like a lamp — glass housing on a solid base, with a small arc glowing inside. Connect an audio source and dial in the sweet spot: loud enough to hear clearly across a room, stable enough to run for hours. The arc should be visible but not blinding — a 5mm gap with moderate power gives a nice warm glow. Add a potentiometer on the audio input for volume control.
-
Optimize the sound. The plasma speaker excels at mids and highs (1 kHz - 20 kHz) but rolls off below about 500 Hz. For full-range listening, pair it with a conventional woofer and use a crossover. On its own, it sounds like a very bright, detailed tweeter with supernatural imaging — because it's a true point source with no cabinet diffraction. Vocals and acoustic instruments sound eerily present.
⚠️ Safety Notes
Spicy Level 4 build. Read the Safety Guide before starting.
- CRT televisions contain a lethal charge on the anode cap even when unplugged. Before touching anything inside a CRT, short the anode cap to the chassis ground using an insulated screwdriver with a wire clipped from the screwdriver shaft to the TV's metal frame. Do this multiple times. The capacitance in the CRT glass can hold charge for days.
- The flyback transformer produces 10-30 kV at its output. This is enough to arc across significant gaps and through insulation you thought was sufficient. Never touch the high-voltage output or electrodes while the circuit is powered. Use a physical power switch, not just unplugging — the flyback's internal capacitance can hold charge briefly.
- The plasma arc produces ozone (O3) and nitrogen oxides (NOx). Both are respiratory irritants. Operate in a well-ventilated room. The glass enclosure concentrates these gases — ensure adequate venting. If you smell a sharp, chlorine-like odor, increase ventilation immediately. Continuous operation in a small closed room is a bad idea.
- The arc produces UV radiation. The glass housing blocks most of it, but don't stare directly at a bare arc for extended periods. Standard glass attenuates UV-B and UV-C effectively; borosilicate (Pyrex) is even better.