#325 — Benchtop Wind Tunnel
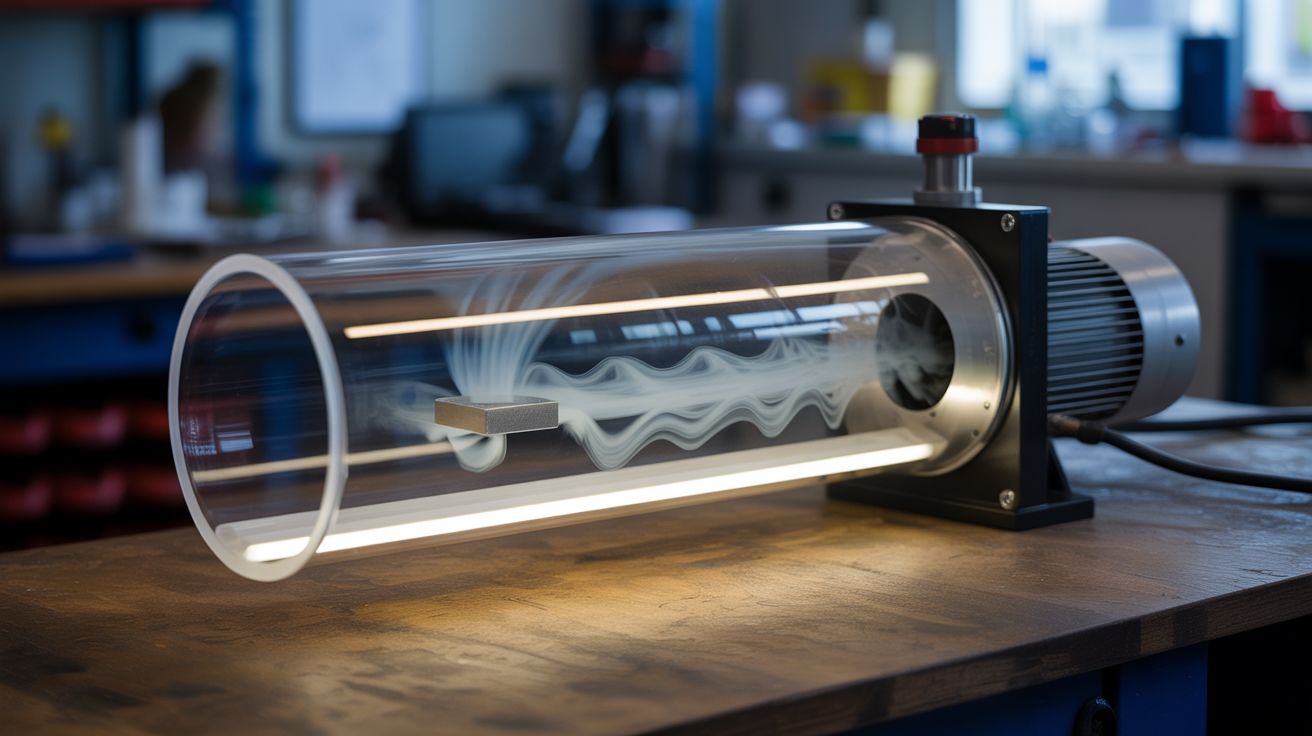
A clear acrylic tunnel with a vacuum motor, smoke injection, and LED lighting — see aerodynamics in real time.
Ratings
🧪 What Is It?
A tabletop wind tunnel is a transparent duct with airflow running through it, a smoke source to make the airflow visible, and a test section where you place objects and watch the air move around them. The vacuum cleaner motor at the downstream end pulls air through the tunnel by suction, creating a smooth, steady airflow in the test section. Smoke injected upstream — from incense sticks, a fog machine, or a smoldering piece of rope — creates thin streamlines that follow the air's path. When those streamlines encounter an object in the test section, they bend, separate, accelerate, swirl, and form turbulent wakes that you can see with your naked eyes. You're watching aerodynamics happen in real time. The same physics that keeps airplanes in the sky and makes race cars stick to the track is playing out at tabletop scale, right in front of you, made visible by a few wisps of smoke.
The construction follows the same principles used in real aerospace wind tunnels, just smaller and cheaper. Air enters through a wide intake fitted with a flow straightener — a tightly packed bundle of drinking straws arranged in a honeycomb grid. The straws break up large-scale turbulence from the room into hundreds of tiny, parallel, laminar streams. The air then passes through a contraction cone — a gradually narrowing duct that accelerates the flow and further smooths out any remaining turbulence. The smooth, fast, uniform air enters the test section, which is built from clear acrylic or polycarbonate so you can see inside from all angles. After the test section, a diffuser (a gradually expanding duct) slows the air back down before it reaches the vacuum motor. The diffuser recovers pressure and makes the motor more efficient — without it, the motor has to work harder to maintain the same test section velocity.
Place a model car in the test section and watch the smoke streamlines split around the hood, accelerate over the roof, and tumble into a chaotic wake behind the trunk — that wake is drag, and you can see exactly how much each shape creates. Carve an airfoil (wing cross-section) from foam and mount it at different angles: at a low angle of attack, the streamlines follow the surface smoothly and you can see the air moving faster over the top (creating lift by Bernoulli's principle). Increase the angle and at some point the flow separates from the top surface in a sudden, dramatic stall — the streamlines go from smooth to chaotic in an instant. Test building shapes to see how wind loads distribute. Test paper airplane designs before flying them. A dimmer switch on the motor lets you vary the wind speed continuously, from a gentle breeze to a miniature gale. The whole thing sits on a desk, costs less than $30 in materials (most of it the acrylic), and teaches more about aerodynamics in an afternoon than a semester of equations.
🧰 Ingredients
- Vacuum cleaner motor + fan assembly — from a dead upright or canister vacuum; the motor is the air mover (curbside, e-waste bin, thrift store — free)
- Clear acrylic sheet or clear storage bin — for the transparent test section (hardware store or craft store, ~$15; or repurpose a clear plastic storage box)
- Drinking straws — 100-200 bundled tightly in a grid to form the flow straightener/honeycomb (dollar store, ~$2)
- Incense sticks — the simplest and cheapest smoke source (dollar store, ~$1)
- Dimmer switch or router speed controller — for variable motor speed / wind speed (hardware store, ~$10)
- LED strip, white or colored — sidelighting to illuminate smoke trails (electronics supplier or dollar store, ~$5)
- Scrap wood, MDF, or thick cardboard — for the intake duct, contraction cone, diffuser, and structural frame (scrap bin — free)
- Smooth tape (aluminum foil tape, packing tape) — for lining the interior duct surfaces (hardware store, ~$4)
- Duct tape — for sealing joints between sections (junk drawer)
- Hot glue — for assembling duct sections and mounting components (junk drawer)
- Small clamps or magnets — for holding test objects in position inside the test section (hardware store, ~$3)
- Optional: fog machine — produces denser, more visible smoke than incense (seasonal clearance, ~$10-20)
- Optional: thin wire or fishing line — for suspending test objects in the center of the airflow (junk drawer)
- Optional: small tubes or straws — for a smoke rake that injects multiple parallel streams (junk drawer)
🔨 Build Steps
-
Design the layout. A wind tunnel has four sections in a line: intake with flow straightener, contraction cone, test section, and diffuser leading to the motor. For a tabletop build, target a test section with a 6-8 inch square cross-section and 12-18 inches of length. The intake should be at least twice the cross-sectional area of the test section (12-16 inches square). The contraction cone tapers smoothly from the intake size down to the test section size over about 12 inches. The diffuser expands from the test section size to the motor duct connection over another 12 inches. Sketch the dimensions before cutting anything.
-
Build the flow straightener. Bundle 100-200 drinking straws tightly together in a grid pattern that fills the intake cross-section. Cut all straws to the same length — 4-6 inches is ideal. The longer the straws, the more effectively they straighten the flow, but they also add friction and reduce airspeed. Secure the bundle with rubber bands, zip ties, or glue around the perimeter. This bundle presses into the intake end of the contraction cone. Its job is critical: without it, the test section airflow is chaotic and turbulent, and smoke trails are meaningless. With it, you get smooth, parallel streamlines.
-
Build the contraction cone. Construct a tapered duct from cardboard, MDF, or sheet metal. The wide end matches the intake/flow straightener size. The narrow end matches the test section size. The taper should be smooth and gradual — abrupt narrowing creates turbulence at the throat. Line the interior surfaces with smooth tape (aluminum foil tape or packing tape) to reduce surface friction and eliminate rough edges. The contraction accelerates the airflow: if the intake is 2x the test section area, the flow velocity doubles in the test section. Higher velocity makes smoke patterns more defined.
-
Build the test section. This is the display piece — it needs to be transparent. Use clear acrylic sheet to construct a rectangular box (6-8 inches square, 12-18 inches long) or repurpose a clear plastic storage bin with the ends cut out. The walls must be smooth inside — any protrusions, seams, or rough spots trip the airflow into turbulence. Seal corners with clear silicone or tape. One wall (top or side) should be removable or have an access door so you can place and adjust test objects without disassembling the tunnel.
-
Build the diffuser. Construct a gradually expanding duct from the test section size to the vacuum motor housing or duct size. The expansion angle should be gentle — about 5-7 degrees per side. Too rapid an expansion and the flow separates from the walls, creating turbulence that backpropagates into the test section and makes the motor less efficient. Line the interior with smooth tape. The diffuser doesn't need to be transparent — opaque materials are fine.
-
Mount the vacuum motor. Attach the vacuum motor at the exit end of the diffuser. The motor pulls air through the entire tunnel by suction. This configuration (suction tunnel) is preferred over a blowing configuration because the motor's own turbulence is downstream of the test section and doesn't affect the test airflow. Connect the motor to a dimmer switch or router speed controller for variable wind speed. Start at low speed and increase gradually — the flow straightener and contraction cone work better at moderate speeds. At maximum motor speed, the tunnel may produce enough airflow to blow lightweight test objects out of the test section.
-
Add smoke injection. Poke small holes in the duct wall upstream of the test section (between the flow straightener and the contraction cone, or at the entrance to the test section). Insert incense sticks through the holes so the burning tips sit inside the airflow. The smoke from the incense is carried downstream through the test section, visualizing the streamlines. For better-defined smoke streams, build a smoke rake: a horizontal tube with 5-8 small holes drilled along its length, connected to a fog machine or incense chamber. The rake injects multiple parallel smoke streams that show the flow field across the full width of the test section.
-
Install LED lighting. Mount LED strips along the sides of the test section, shining inward and slightly forward. The LEDs illuminate the smoke trails against the dark background behind the tunnel, making them glow dramatically. White LEDs give the clearest view of flow patterns. Colored LEDs (blue or green) create a more dramatic visual effect. Angle the lights so they illuminate the smoke from the side — backlighting produces silhouettes, sidelighting produces bright trails against a dark background.
-
Test with basic shapes. Mount test objects in the center of the test section using thin wire, fishing line, or a small stand from below. Start with simple shapes: a sphere, a flat plate perpendicular to the flow, a streamlined teardrop shape, and a simple airfoil. Turn on the motor at low speed, light the incense, and observe. The sphere should show smooth flow around the front half and a turbulent wake behind. The flat plate should show a large, chaotic wake. The teardrop should show almost no wake — the streamlines close cleanly behind it. The airfoil, tilted at a slight angle, should show streamlines deflected downward behind it (that deflection is lift).
-
Photograph and document. The smoke patterns are ephemeral — photograph or video them for comparison. Use a dark background behind the test section and strong LED sidelighting for the best contrast. Long-exposure photographs (1-2 second shutter) smooth out instantaneous turbulent fluctuations and show the time-averaged flow pattern, which is often more informative than a snapshot. Compare the flow around different shapes at the same wind speed to see which designs create the most and least drag.
⚠️ Safety Notes
- Vacuum motors are loud, especially at high speed in an enclosed duct. Wear hearing protection during extended testing sessions.
- The motor housing gets hot during prolonged operation. Don't touch it after more than 10-15 minutes of continuous running. Give it cool-down breaks.
- Keep incense sticks and any open flames away from the motor intake. The motor fan can scatter embers, and fog machine fluid residue can coat the motor windings over time. Use smoke injection upstream, far from the motor.
- Ensure the dimmer switch or speed controller is rated for the motor's wattage. An undersized controller can overheat and fail.
- Acrylic dust from cutting is an irritant — wear a dust mask and safety glasses when cutting acrylic. Cut acrylic with a fine-toothed saw or score-and-snap method, not a high-speed grinder.
- If using a fog machine, ventilate the room. Continuous fog machine use in a closed room can trigger smoke detectors and irritate airways.