#326 — Air Hockey Table
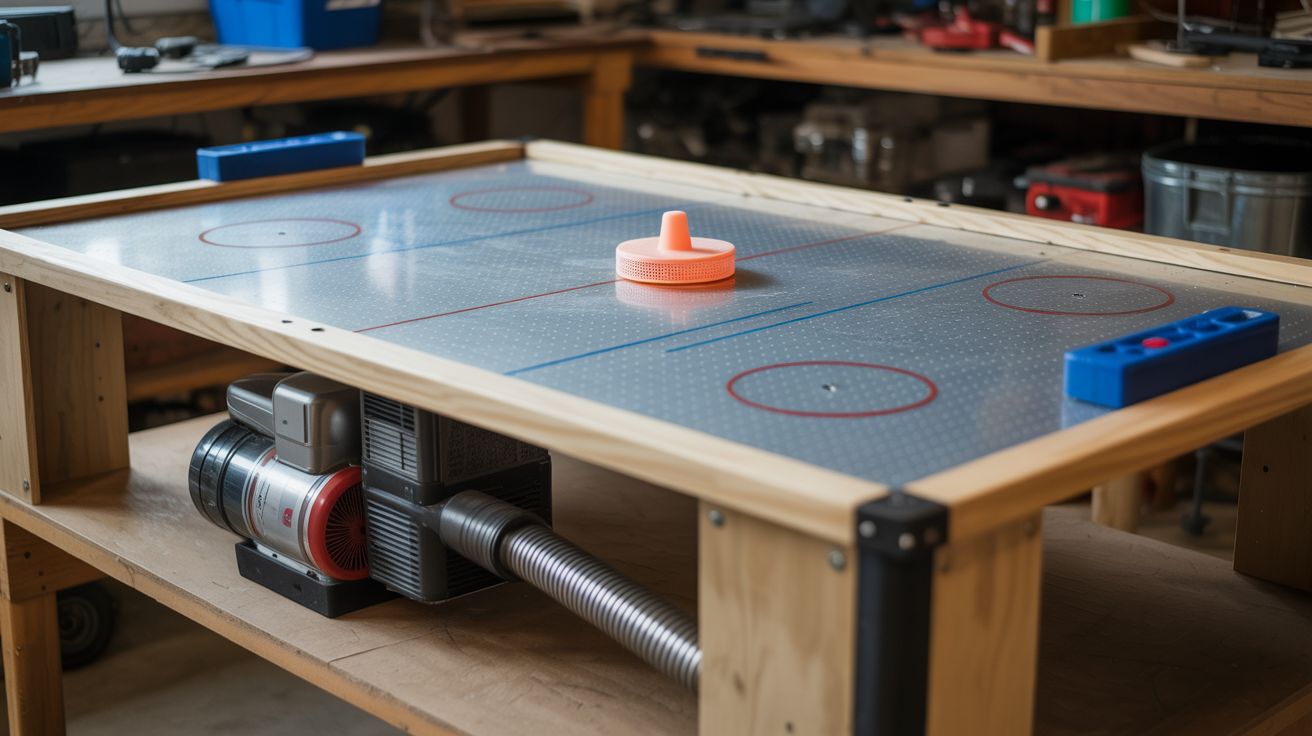
Reverse a vacuum cleaner motor for upflow through a drilled surface. Add a puck and paddles. Game on.
Ratings
🧪 What Is It?
A real air hockey table works by blowing air upward through hundreds of tiny holes in a flat surface, creating a thin cushion of air that a lightweight puck floats on. The puck rides on this air film with almost zero friction, gliding and bouncing off bumper rails like it's weightless. Commercial air hockey tables cost $200 at the low end and $2,000+ for arcade quality. This build does the same thing using a reversed vacuum cleaner motor, a sheet of MDF drilled with hundreds of holes, and a sealed box underneath (the plenum) that distributes the air pressure evenly across the playing surface. The motor blows air into the plenum, the plenum pressurizes, and air escapes upward through every hole simultaneously, creating a uniform air cushion across the entire table. Total materials cost: about $25, assuming the vacuum motor is free from a dead vacuum.
The physics is elegant in its simplicity. The puck needs to be lightweight (a few ounces) and have a flat, smooth bottom. When it sits on the playing surface, it blocks the holes beneath it. Air pressure from the plenum pushes upward against the puck's bottom surface. Once the upward force exceeds the puck's weight, it lifts — typically less than a millimeter, but enough to eliminate surface contact and friction. The puck now responds to the slightest touch and maintains its velocity until it hits a rail or another paddle. The air film is self-regulating: if the puck presses down on one side (from a paddle hit), the holes on that side are partially blocked, pressure builds up, and the puck self-levels. This is the same principle that air bearings in precision manufacturing equipment use, just cruder and louder.
The vacuum motor is overkill for this job — a typical vacuum motor pushes 1000-1500 watts, enough to levitate a bowling ball if you drilled enough holes. A dimmer switch or router speed controller dials the airflow back to the sweet spot: enough pressure to float the puck smoothly, but not so much that it blasts the puck off the table or creates a wind tunnel above the surface. The critical construction detail is the drilling pattern — the holes need to be evenly spaced (about 1 inch apart in a grid), consistently sized (1/16 inch diameter), and cleanly deburred on the top surface. Any rough edges catch the puck and ruin the glide. The plenum box underneath needs to be sealed well enough that air preferentially escapes through the holes, not through gaps in the box joints. Get those two things right — clean holes and a sealed plenum — and you have a fully functional air hockey table that plays exactly like the ones in arcades. Add bumper rails, goals, scoring slots, and a couple of paddles carved from scrap wood or acrylic, and you're hosting tournaments.
🧰 Ingredients
- Vacuum cleaner motor — reversed for blow mode; from a dead upright or canister vacuum (curbside, e-waste bin, thrift store — free)
- MDF or smooth plywood, 4'x2' — the playing surface; MDF is preferred because it's smoother and drills cleaner than plywood (hardware store, ~$10)
- Drill press + 1/16" drill bit — for drilling hundreds of evenly spaced holes; a drill press ensures consistent, perpendicular holes (workshop; drill bits ~$3 for a multi-pack since they break)
- Plywood or MDF — for the plenum box walls, 4-6" tall strips to match the playing surface footprint (hardware store, ~$10)
- PVC pipe or flexible duct, 3-4" diameter — connects the motor output to the plenum box (hardware store, ~$5)
- Dimmer switch or router speed controller — essential for dialing in the right airflow (hardware store, ~$10)
- Wood strips or aluminum angle, 1" tall — bumper rails around the perimeter (hardware store, ~$5)
- Wood glue + screws — for assembling the plenum box and attaching the playing surface (hardware store, ~$5)
- Silicone sealant or caulk — for sealing plenum box joints airtight (hardware store, ~$5)
- Puck — 3D-printed hollow disc, thin acrylic circle cut with a hole saw, or a large bottle cap with a flat bottom (scrap bin or 3D printer — free to $2)
- Paddles — cut from scrap acrylic, plywood, or MDF; a flat bottom disc with a knob handle on top (scrap bin — free)
- Sandpaper, 120 and 220 grit — for deburring holes and smoothing the playing surface (hardware store, ~$3)
- Ruler + pencil — for marking the drilling grid (toolbox)
- Optional: polyurethane or lacquer spray — for sealing the MDF surface against humidity warping (hardware store, ~$6)
- Optional: acrylic paint — for marking goal lines, center line, and face-off circle (craft store, ~$3)
- Optional: electronic scoreboard — Arduino + 7-segment displays + IR break-beam sensors in the goals (electronics supplier, ~$10)
- Optional: LED strip — mount under the translucent playing surface or along the rails for glow effect (electronics supplier, ~$5)
🔨 Build Steps
-
Build the plenum box. Cut strips of plywood or MDF 4-6 inches tall and assemble them into a rectangular box matching the footprint of the playing surface (4'x2' or whatever size you've chosen). Leave the top completely open — the playing surface will become the lid. Cut a hole in one end wall sized to accept the PVC duct from the vacuum motor. Glue and screw all joints. Seal every seam — inside corners, outside edges, screw holes — with silicone caulk. The plenum must be airtight so that all air pressure escapes upward through the drilled holes in the playing surface, not through gaps in the box. Test by sealing the top with a flat board and blowing into the duct hole — you should feel resistance. If air hisses out of joints, seal them.
-
Mark the drilling grid. On the MDF playing surface, use a ruler and pencil to draw a grid of marks spaced 1 inch apart in both directions across the entire surface. A 4'x2' table will need roughly 1,100 holes (47 x 23 grid). Yes, that's a lot of holes. A consistent grid is important — uneven spacing creates dead spots where the puck drags and live spots where it accelerates. Use a square or straightedge to keep the grid lines parallel. Some builders make a drilling jig — a piece of scrap with a hole drilled in it that clamps to the MDF at each grid intersection to guide the drill bit.
-
Drill the holes. Using a drill press with a 1/16" drill bit, drill through the MDF at every grid mark. The drill press ensures each hole is perpendicular to the surface — angled holes direct air sideways instead of upward, creating uneven float. Apply steady, moderate pressure — MDF drills easily but the thin 1/16" bit is fragile and will snap if you force it or let it wobble. Have spare bits on hand. This step takes 1-3 hours depending on patience and technique. Work in rows, left to right, to avoid losing your place in the grid.
-
Deburr the top surface. Every drilled hole leaves a small raised ring of MDF fiber on the top surface. These burrs catch the puck and ruin the air cushion effect. Sand the entire top surface with 220-grit sandpaper on a flat sanding block — don't use a random orbital sander, which can dish out the area around the holes and create an uneven surface. Sand in straight strokes with the grain (if any). After sanding, brush or vacuum all the dust out of the holes. Hold the board up to the light and verify you can see through every hole — clogged holes kill the float.
-
Seal the surface (optional but recommended). MDF is hygroscopic — it absorbs humidity from the air and can swell and warp over time. A warped playing surface creates hills and valleys where the puck stalls or accelerates unpredictably. Apply two light coats of spray polyurethane or lacquer to the top surface. Avoid pooling in the holes — spray light, quick passes and let each coat dry fully. The sealant also makes the surface slicker, improving puck glide.
-
Mount the playing surface on the plenum. Set the drilled MDF board on top of the plenum box. Screw it down from above, countersinking the screws below the surface so they don't catch the puck. Seal the joint between the playing surface and the plenum box walls with silicone caulk — you want the only air exit to be the drilled holes. If the MDF doesn't sit perfectly flat on the plenum walls (check with a straightedge), add foam weatherstripping tape along the top edges of the plenum walls as a gasket.
-
Connect the vacuum motor. Flip the motor to blow mode — many vacuum motors are reversible by swapping the motor leads, or you can simply connect to the exhaust side of the fan housing instead of the intake. Connect the motor's output to the plenum box's duct hole using PVC pipe or flexible ducting. Secure with hose clamps and seal any gaps with duct tape or silicone. The connection should be airtight — air leaks here reduce the pressure available at the playing surface.
-
Install the speed controller. Wire the dimmer switch or router speed controller inline with the motor power. Turn on the motor at full speed first and hold your hand over the playing surface — you should feel a uniform upward breeze through every hole. If some areas feel weak, check for clogged holes or plenum leaks underneath. Then dial the speed way down. Place your puck on the surface and slowly increase motor speed until the puck just barely floats — it should hover silently and respond to the lightest finger push. Increase speed a bit more until the puck glides freely when pushed but doesn't vibrate or bounce on its own. This is your operating speed. Mark it on the dimmer.
-
Build and install the bumper rails. Cut wood strips or aluminum angle to length and mount them around the perimeter of the playing surface, standing 1 inch tall. The rails keep the puck on the table and create the ricocheting bounce that makes air hockey fun. Mount them flush with the edge of the playing surface — any gap between the rail and the surface lets the puck wedge underneath, jamming the game. Miter the corners for clean joints. Sand any rough edges that could scratch the puck.
-
Cut the goals. At each short end of the table, cut an opening in the bumper rail about 4-6 inches wide. This is the goal. Below each goal, attach a ramp or channel that guides scored pucks into a collection tray or slot so they don't fall on the floor. In arcade tables, the puck drops into a return channel and slides to a tray at the side — replicate this with a sloped piece of wood or bent sheet metal under the playing surface.
-
Make the puck and paddles. The puck should be as light as possible with a flat, smooth bottom and a diameter slightly larger than the hole spacing (so it always covers at least a few holes for consistent float). A 3" diameter disc cut from 1/8" acrylic is ideal — use a hole saw on a drill press. Sand the bottom smooth. Alternatively, 3D-print a hollow disc or use a large jar lid. The paddles are larger discs (4-5" diameter) with a round knob handle glued or screwed on top. The bottom must be flat and smooth — the paddle rides on the same air cushion as the puck. Cut from acrylic or MDF, sand smooth, and add a comfortable grip on top (a drawer knob, a bottle cap, or a shaped piece of wood).
-
Play and iterate. Drop the puck, grab the paddles, and test. The puck should glide effortlessly and bounce cleanly off the rails. If it stalls in certain areas, check for clogged holes, surface roughness, or uneven plenum pressure underneath. If it floats too aggressively and bounces unpredictably, dial back the motor speed. If the paddles don't float (they're heavier than the puck), you may need slightly more airflow or lighter paddles. Paint goal lines, a center line, and a face-off circle for the full arcade experience. Add LED strips under the rails or beneath a translucent playing surface for a glow-table effect.
⚠️ Safety Notes
- The vacuum motor is loud — expect 70-85 dB during play. Hearing protection is recommended for extended sessions, especially indoors.
- Keep fingers away from the motor fan housing — the reversed motor exhaust port is now an open intake, and long hair, loose clothing, or fingers near the intake can be caught by the spinning impeller.
- The motor gets hot during continuous operation. Monitor the housing temperature during long gaming sessions. Give it 10-minute cool-down breaks every 30-45 minutes of continuous play.
- Ensure the table is stable and level. An unbalanced table with a heavy motor underneath can tip if leaned on. Add wide feet or clamp the table to a workbench.
- If the MDF playing surface warps from humidity, the air cushion becomes uneven and the puck behaves erratically. Seal the surface with polyurethane to prevent moisture absorption. Store the table in a climate-controlled space.
- The puck can fly off the table if hit hard near a rail gap or if the air pressure is too high. Play at a motor speed that provides smooth float without launching the puck upward. Keep the puck lightweight — a heavy puck hit hard can sting if it catches someone.