#331 — Fire Organ
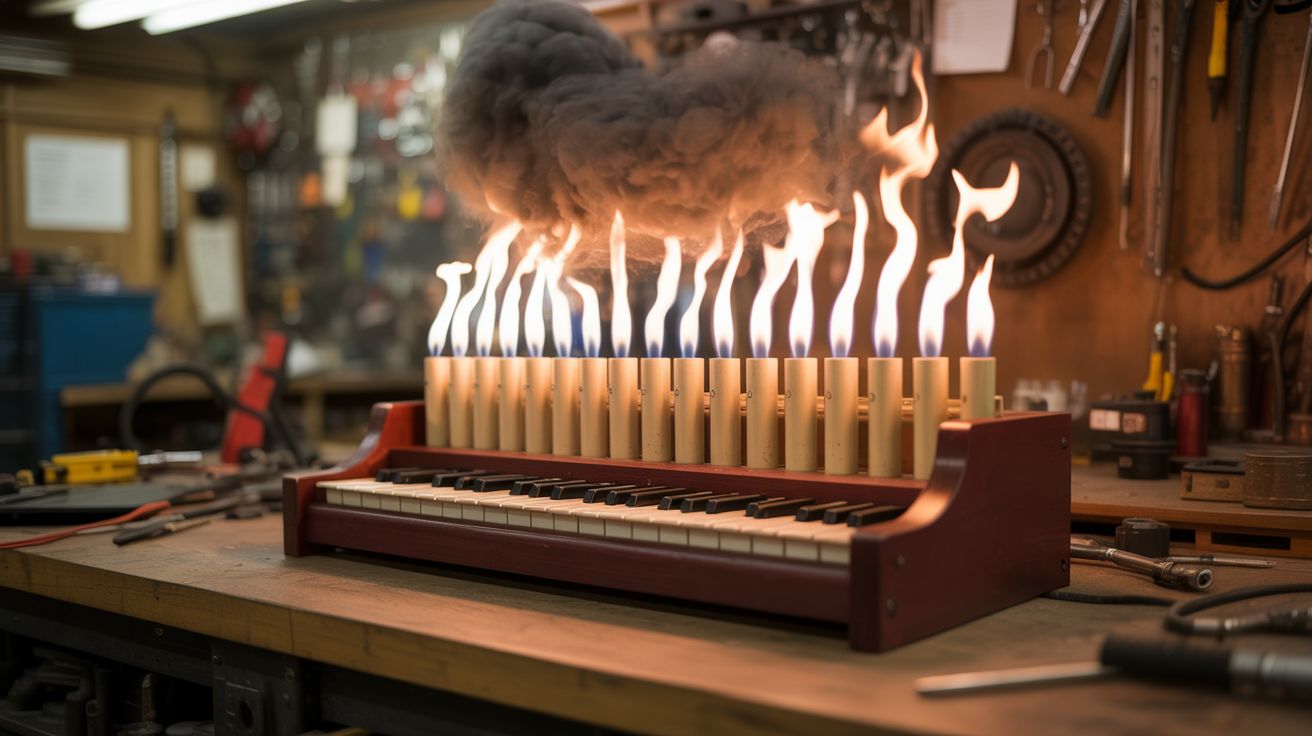
A PVC pipe organ that plays music and shoots synchronized flames from every pipe — because sound alone wasn't dramatic enough.
Ratings
🧪 What Is It?
A playable pipe organ built from PVC tubes, driven by a salvaged vacuum cleaner blower, where each pipe is paired with a propane jet that fires when the note plays. An Arduino reads MIDI input — from a keyboard, a computer, or a sequencer — and triggers solenoid valves that do two things simultaneously per note: open an air gate to sound the pipe, and open a propane valve to feed a jet nozzle mounted at the pipe's mouth. A piezo igniter keeps a pilot flame lit at each nozzle. The result is an instrument that produces real organ tones accompanied by columns of fire that dance in time with the music. Play a chord and three flames erupt. Run a scale and fire ripples across the pipes like a wave.
The organ side is straightforward — PVC pipe organs are a well-established DIY build. Each pipe's pitch is determined by its length, and a blower provides continuous air pressure to a wind chest that distributes air to individual pipes via valves. The fire side adds a parallel propane manifold with its own set of solenoid valves, one per pipe. The Arduino fires both the air solenoid and the propane solenoid together so the sound and flame are perfectly synchronized. The solenoid valves are the key component — the air-side valves can be salvaged washing machine water inlet valves, but the propane-side valves MUST be gas-rated, normally-closed solenoid valves designed for flammable gas service.
This is not a build you rush. The propane system demands respect, the electrical system demands reliability, and the whole thing demands thorough testing before you stand in front of it and play "Toccata and Fugue in D Minor" while fire shoots out of every pipe. But when it works — and it does work — there is nothing else like it. This is the build that gets you on the local news.
🧰 Ingredients
- PVC pipes, schedule 40, various lengths for different pitches — 1.5" to 2" diameter (source: hardware store or construction scrap, ~$15-25 for a full octave)
- Salvaged vacuum cleaner blower motor (source: dead upright vacuum — you want the motor + fan assembly, free)
- Solenoid valves, 12V DC, one per pipe — need two sets: air and propane. Propane solenoids MUST be gas-rated, normally-closed valves — standard washing machine water inlet valves are NOT rated for flammable gas service and may leak. Source gas-rated solenoids from welding supply or HVAC suppliers (~$8-15 each). Air-side valves can be salvaged water inlet valves (source: dead washing machines, dishwashers — free)
- Arduino Uno or Mega (source: own or ~$10-15)
- MIDI shield or USB-MIDI adapter for Arduino (source: electronics supplier, ~$10)
- Propane tank with low-pressure adjustable regulator (0-5 PSI output — NOT a standard BBQ regulator, which outputs 10-30 PSI) and hose (source: welding supply or specialty propane supplier, ~$20-30 for a 0-5 PSI regulator)
- Copper or steel tubing for the propane manifold, 1/4" (source: hardware store or dead fridge, ~$10)
- Brass fittings, tees, and needle valves for propane distribution (source: hardware store, ~$15-20)
- Piezo igniters — one per pipe or a shared pilot flame system (source: dead BBQ grills or gas stoves, free)
- Plywood for the wind chest and frame (source: scrap wood, free-$10)
- 12V power supply, minimum 10A for driving multiple solenoids (source: old PC ATX power supply — the 12V rail, free)
- MOSFET transistors (e.g., IRLZ44N) or relay module for Arduino to drive solenoids (source: electronics supplier, ~$5)
- Flexible tubing for air connections (source: hardware store or salvaged dryer vent hose, ~$5)
- Flashback arrestors for each propane line (source: welding supply, ~$5-8 each)
🔨 Build Steps
-
Build and tune the PVC pipes. Cut PVC pipes to length for each note in your scale. A full octave of C major is a good starting point — 8 pipes. Pipe length determines pitch: for a closed-end pipe, the fundamental wavelength is 4x the pipe length. Start longer than needed and trim in small increments, testing pitch with a tuner after each cut. Cut a rectangular voicing window near the bottom of each pipe (the labium) where air crosses a sharp edge to produce sound, same principle as a recorder or tin whistle.
-
Build the wind chest. Construct an airtight plywood box that serves as the pressurized air reservoir. All pipes mount on top of the chest with holes underneath each pipe. Solenoid air valves inside the chest control airflow to each pipe individually. The chest needs one large inlet port for the blower connection. Seal every joint with silicone — any air leak reduces pressure and makes the pipes breathy and weak.
-
Integrate the blower. Mount the salvaged vacuum blower motor so it feeds directly into the wind chest's inlet. You need enough pressure to drive all pipes simultaneously (in case you play a full chord) but not so much that the pipes overblow and screech. A variable speed controller (a router speed control or a simple PWM circuit) on the motor lets you dial in the right pressure. Test with all air valves open — every pipe should sound clean and steady.
-
Build the propane manifold. Run a 1/4" copper or steel main supply line from the propane regulator. Branch off with tee fittings to each pipe position, one branch per pipe. Install a solenoid valve on each branch. At the end of each branch, install a small brass jet nozzle (a brass cap with a single 1/32" hole drilled in it) aimed upward at the pipe mouth. Install a flashback arrestor between the propane tank and the manifold. Set the regulator to low pressure — 2-5 PSI is plenty. You want controlled jets, not flamethrowers.
-
Install the ignition system. Mount a piezo igniter at each pipe's jet nozzle, or run a continuous pilot flame along the row of nozzles using a thin steel tube with small holes (like a miniature Rubens' tube). The pilot flame approach is simpler and more reliable — individual piezo igniters have a habit of failing at the worst possible moment. If using a pilot flame bar, it runs on its own low-pressure propane feed, always lit.
-
Wire the solenoid valves. Each pipe has two solenoid valves — one air, one propane — that fire together. Wire each solenoid pair through a MOSFET transistor driven by an Arduino digital pin. The Arduino pin goes to the MOSFET gate, the MOSFET switches the 12V solenoid circuit. Add flyback diodes across every solenoid coil (solenoids are inductors — without the diode, the voltage spike when they de-energize will fry your MOSFETs and eventually your Arduino).
-
Program the Arduino. Flash the Arduino with MIDI-receiving firmware. Map each incoming MIDI note number to its corresponding digital pin (which fires the paired air + propane solenoids for that pipe). Note-on opens both valves; note-off closes both. Add a configurable minimum fire duration (50-100ms) so even staccato notes produce a visible flame burst. Test with a MIDI keyboard — each key should produce sound and fire from the correct pipe.
-
Pressure test the propane system. Before any ignition testing, pressurize the propane manifold and spray every fitting, joint, and solenoid connection with soapy water. Watch for bubbles. Fix every leak. Then test each solenoid electrically — trigger each one from the Arduino and confirm propane flows only through the intended nozzle. No cross-talk, no drips, no slow leaks from closed valves.
-
First fire test — one pipe at a time. Outdoors. Fire extinguisher within arm's reach. Light the pilot flame. Trigger one pipe's note and confirm: air sounds the pipe, propane jet ignites from the pilot, flame appears at the pipe mouth in sync with the sound. Repeat for every pipe individually. Adjust nozzle positions and propane flow for consistent flame height across all pipes.
-
Full integration test. Play scales, chords, and simple melodies. Watch for: solenoid response lag (all notes should fire within 20ms of MIDI input), flame consistency (no sputtering or delayed ignition), and any propane smell from accumulated unburned gas. If a solenoid is sluggish, it may need a higher supply voltage or a stronger spring return.
-
Build the frame and finish. Construct a proper stand or table for the organ. The pipes should be arranged in a visually pleasing row — traditional ascending height like a church organ looks best. Hide the wind chest, blower, manifold, and electronics inside the frame. Route the propane hose and power cables cleanly. Add a master kill switch that cuts propane flow at the regulator — a quarter-turn ball valve you can shut instantly.
-
Performance prep. Program a few songs into a MIDI sequencer for automated playback if you want hands-free operation (great for events). Test the full sequence outdoors first. Set up your filming angle — the fire looks best shot from slightly below against a dark background, at dusk or night. You built a fire organ. It deserves proper cinematography.
⚠️ Safety Notes
Spicy Level 5 build. Read the Safety Guide before starting.
[!CAUTION] This build combines open propane flames with electrical systems. Take it seriously. A propane leak near an electrical spark source can cause an explosion. Every propane joint must be leak-tested before every session. The master shutoff valve must be accessible from your playing position. Never leave the propane on with the pilot flame unlit — unburned gas accumulates fast.
- Flashback arrestors are mandatory, not optional. A flame traveling backward down a propane line into the manifold or tank is catastrophic. Install one between the tank and the manifold AND individual arrestors at each nozzle. Both locations are required — the tank-side arrestor protects against catastrophic tank involvement, and per-nozzle arrestors prevent cross-ignition between pipes through the manifold.
- Solenoid valve failure mode matters. Use normally-closed solenoid valves for the propane lines. If the Arduino crashes, if power is lost, if a wire comes loose — normally-closed valves spring shut and stop gas flow. Normally-open valves would keep flowing gas with no ignition. Verify the valve type before you buy or salvage.
- Keep a Class B fire extinguisher within arm's reach. Not across the room. Not in the garage. Within arm's reach, every time.
- Outdoors only. This is not an indoor instrument. Even with perfect sealing, propane is heavier than air and pools in low spots. Operate in open air with no overhead structure.
🔗 See Also
- PVC Pipe Organ — the non-flammable version of the organ build
- Fire Tornado Table — another fire-based visual showstopper
- Rubens' Tube — sound + fire visualization in tube form