#335 — CRT Electron Art Array
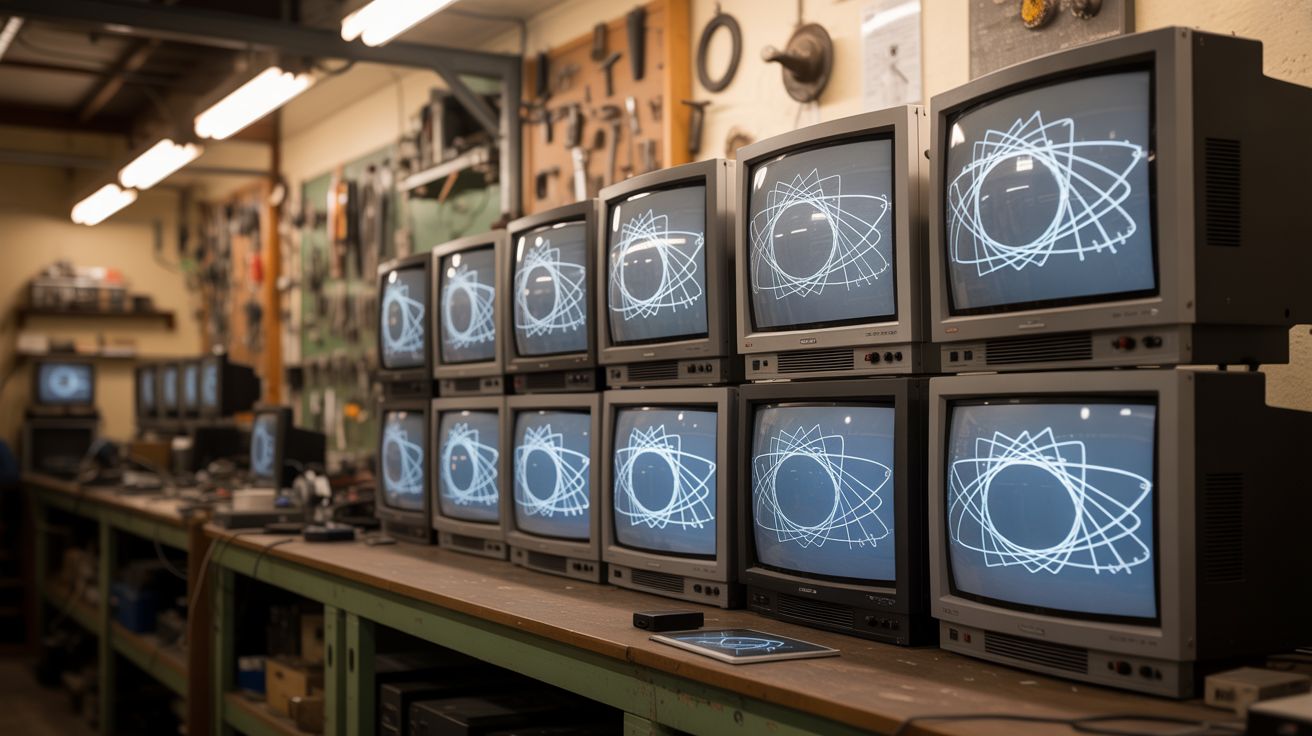
A wall of hacked CRT televisions drawing Lissajous spirals and phosphor lightning in real-time — turning the most obsolete technology on earth into the most striking gallery installation in the room.
Ratings
🧪 What Is It?
Every CRT television is an electron cannon. A heated cathode boils off electrons, a flyback transformer accelerates them to 15-25kV, and deflection yokes steer the beam across a phosphor-coated screen 15,000+ times per second. Normally, a TV's internal circuits control the deflection to draw a picture. But if you disconnect those circuits and feed your own signals — audio, function generators, Arduino output — the electron beam draws whatever waveform you give it directly onto the phosphor screen.
Feed a sine wave into horizontal deflection and another sine wave into vertical deflection, and you get Lissajous figures — mesmerizing, endlessly evolving geometric curves. Feed music, and the beam paints organic, chaotic patterns that dance with the rhythm. Hold a neodymium magnet near the screen, and the beam bends and warps in real-time, painting rainbow distortions across the phosphor.
Now multiply that by six. Mount 3-6 modified CRTs in a grid on a wall, each receiving slightly different signals from a shared audio source or pattern generator. The result is a gallery installation of glowing phosphor art — each screen showing a different geometric variation, all synchronized to the same music. The CRTs that people throw on the curb every week are literally the most expressive display technology ever manufactured, and nobody knows it.
🧰 Ingredients
- CRT televisions x3-6 — the older and bigger the better, 13"-27" (source: curbside, recycling centers, thrift stores — free or $5-$10 each)
- Audio amplifier — stereo, 10-50W per channel (source: dead stereo receiver, thrift store — free/$5)
- 3.5mm audio cables and splitters (source: junk drawer)
- Neodymium magnets x4-6 — for manual deflection experiments (online, ~$5-$10)
- Function generator (optional) — or use a phone app / Arduino with DAC (phone app is free; Arduino + MCP4725 DAC ~$5)
- Audio mixer — 4+ channel, for blending signals to different TVs (source: thrift store, dead PA system — free/$10)
- Heavy-duty wall mount brackets or shelf system (hardware store, ~$20-$30)
- 14-gauge wire, wire nuts, solder, heat shrink (hardware store / electronics supplier)
- Power strip with individual switches (hardware store)
- High-voltage discharge tool — a screwdriver with an insulated handle + clip lead to chassis ground (DIY from parts on hand)
🔨 Build Steps
-
Discharge the CRT — this is non-negotiable. Unplug the TV and let it sit for at least 24 hours. Then, using an insulated screwdriver connected to the chassis ground via a clip lead, slide the screwdriver tip under the anode cap (the suction cup on the side of the tube) and touch the anode connector underneath. You'll hear a loud snap as the stored charge dumps. Wait 30 seconds, then discharge again — some CRTs exhibit "bounce back" where residual charge rebuilds. Verify with a multimeter set to DC voltage (high range, 20kV+ scale if available) that the anode reads 0V before proceeding. Never trust a fixed number of discharges alone — always verify with a meter. The flyback capacitor holds enough energy to kill you — treat this step with the same respect you'd give a loaded weapon.
-
Remove the case and identify the deflection yoke. With the CRT discharged, remove all case screws and lift off the plastic housing. Locate the deflection yoke — it's the copper-wound assembly clamped around the neck of the tube, just behind the electron gun. It has two sets of coils: horizontal deflection and vertical deflection. Trace the wires from the yoke back to the main circuit board and identify which connector is horizontal (H) and which is vertical (V).
-
Disconnect the deflection circuits but preserve the electron gun power. Unplug the yoke connectors from the main board. The TV's scanning circuits normally drive these coils with sawtooth waves to raster-scan the beam across the screen. You're replacing those signals with your own. Leave the flyback transformer, high-voltage section, and heater circuits connected — you still need the cathode heater powered (to emit electrons), the grid bias active (to control beam intensity), and the focus voltage present (to produce a sharp dot). If you disconnect the main board entirely, the electron gun won't fire. The CRT needs to be "on" with the beam energized but deflection driven externally. On most TVs, this means the main board stays powered — you only disconnect the deflection yoke from the board.
-
Wire external audio to the deflection coils. Connect the left channel of a stereo audio amplifier to the horizontal deflection coil. Connect the right channel to the vertical deflection coil. Start with very low volume — the deflection coils are low-impedance loads (typically 5-15 ohms). You need a 20-50W amplifier to drive the beam across the full screen — a small headphone amplifier won't cut it. The amplifier is now your XY controller: left channel moves the beam horizontally, right channel moves it vertically.
-
Build an audio source and mixer for XY control. For Lissajous figures, feed two sine waves at different frequencies — one per channel. A phone app function generator works, or use an Arduino with two DAC outputs. For music-reactive art, split a stereo music signal so left goes to H and right goes to V. An audio mixer lets you blend function generator signals with music, crossfade between modes, and adjust the intensity per channel. Each TV in your array can receive a slightly different mix.
-
Experiment with magnets. Before committing to the final setup, hold neodymium magnets near the powered screen (not the neck — stay away from the electron gun). The magnetic field deflects the beam and distorts the phosphor color mask, creating rainbow-colored warps and bends. This is addictive and produces unique, unrepeatable visual effects. Note: strong magnets held in one place too long can permanently magnetize the shadow mask, causing color distortion that persists even after the magnet is removed. On CRTs you plan to keep pristine, use magnets sparingly. On junk TVs destined for art — go wild.
-
Modify multiple TVs. Repeat steps 1-4 for each CRT in your array. Consistency helps: try to use the same model TV for a uniform look, or deliberately mix sizes and aspect ratios for a more eclectic installation. Label each TV's deflection wiring clearly. Test each one individually before building the wall array.
-
Synchronize the array. Connect all TVs to the same audio source through the mixer, with per-TV level and balance controls. When the same music feeds all units but each receives a slightly different channel mix or phase offset, the screens display variations on the same theme — visually coherent but individually unique. For tighter synchronization, use an Arduino to generate coordinated waveforms for all units simultaneously.
-
Wall mount the array. Build a sturdy shelf or bracket system — CRTs are heavy (a 27" set weighs 80+ lbs). Use wall studs, lag bolts, and steel brackets rated for the load. A 2x3 grid of 13" TVs is more manageable and still visually stunning. Route all power cables behind the mounting surface. Add a power strip with individual switches so you can turn each TV on/off independently.
-
Set up the power distribution and final tuning. Connect all TVs through a single GFCI-protected circuit. Power them up one at a time and adjust the audio levels per TV until the beam traces fill each screen without overdriving (if the beam deflects too far, it goes off-screen and you lose the pattern). Dim the room lights. Turn on the music. Watch the phosphor paint.
⚠️ Safety Notes
Spicy Level 4 build. Read the Safety Guide before starting.
[!CAUTION] CRT flyback transformers operate at 15,000-25,000 volts. This is a lethal voltage at sufficient current to stop a human heart. Even unplugged, CRTs store charge in the anode capacitor for days or weeks. Always discharge the tube before touching anything inside the case. Never work alone. Never reach inside a powered CRT. Keep one hand in your pocket when probing near high-voltage sections. If you haven't worked with high voltage before, practice the discharge procedure on a small TV before scaling up.
- The CRT is a vacuum tube. If the glass envelope is cracked or broken, it will implode violently, scattering glass shards. Never strike, drop, or apply pressure to the tube face or neck. Wear safety glasses whenever the case is off. If a tube has visible damage, do not power it on — dispose of it at an e-waste facility.
- CRTs contain lead and phosphor compounds. Don't sand, grind, or break phosphor-coated glass. If a tube breaks, ventilate the area and clean up with wet methods (damp paper towels, not a vacuum or broom). Wash hands thoroughly after handling CRT internals.
- Weight. A wall of CRTs is extremely heavy. Over-engineer your mounting. If a bracket fails and an 80-pound TV falls off the wall, it's a serious injury risk. Use wall studs, not drywall anchors.
🔗 See Also
- CRT Electromagnetic Art — single-CRT version of this concept with deeper magnet experiments
- Hard Drive POV Clock — another persistence-of-vision display from salvaged parts