#321 — DIY EEG Headband
Read your own brainwaves with salvaged biosensors. Visualize alpha, beta, and theta waves in real-time on your phone.
Ratings
🧪 What Is It?
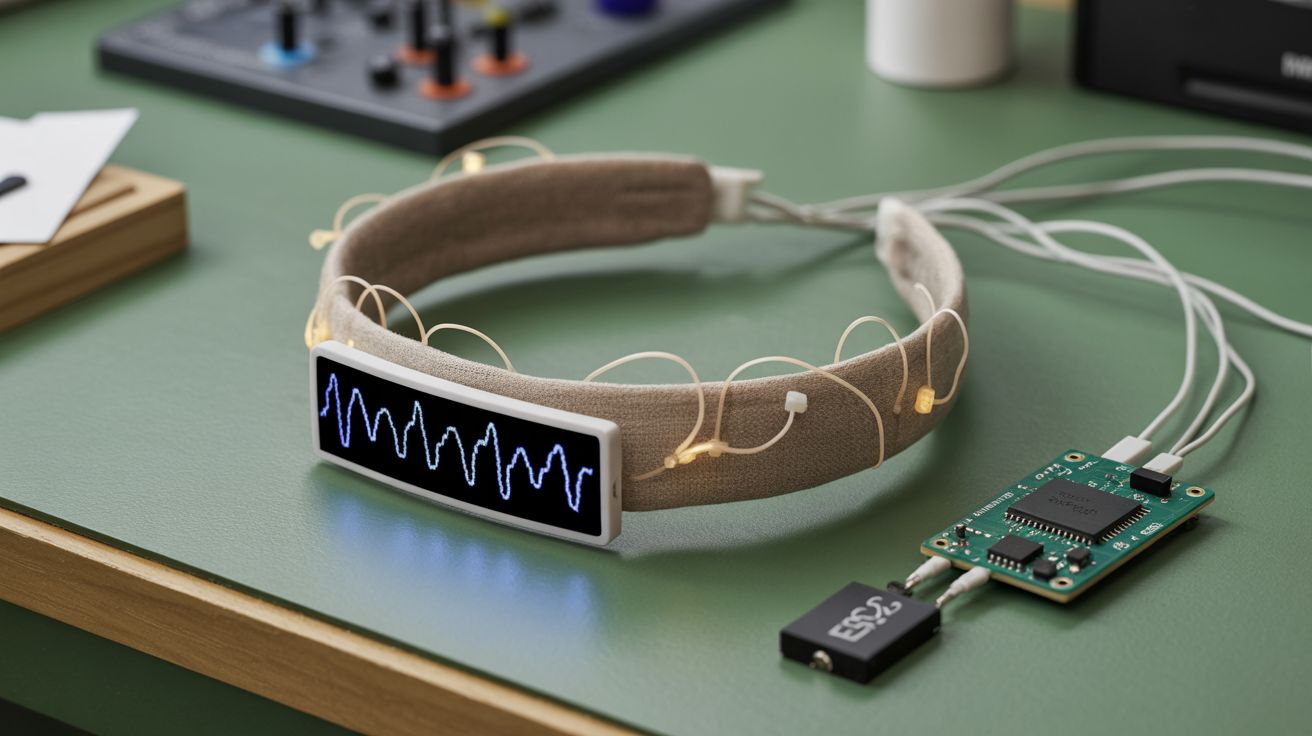
An electroencephalogram (EEG) measures the tiny electrical signals your brain produces — microvolt-level fluctuations generated by billions of neurons firing in synchrony. Commercial EEG headsets like the Muse or Emotiv cost $200-$400 and lock you into proprietary apps. This build does the same thing for about $12 using an AD8232 biopotential amplifier module (designed for ECG heart monitoring but equally capable of picking up brainwaves), an ESP32 microcontroller, and three dry electrodes mounted in a headband. The result is a wearable device that reads your brain's electrical activity in real-time and displays it on a small OLED screen or streams it to your phone via Bluetooth.
The AD8232 is the key component — it's a single-lead biopotential front-end that amplifies the tiny signals from your scalp while filtering out noise. Three electrodes contact your skin: one on the center of your forehead (the signal electrode, picking up brain activity from the prefrontal cortex), one behind the ear (the reference electrode), and one on the earlobe (the driven right leg / ground electrode that actively cancels common-mode noise like 60Hz powerline interference). The voltage difference between the signal and reference electrodes, after amplification and filtering, gives you a clean EEG waveform. The ESP32 samples this analog signal at 256Hz or higher, then runs a Fast Fourier Transform (FFT) to decompose the raw waveform into its constituent frequency bands: delta (0.5-4Hz, associated with deep sleep), theta (4-8Hz, drowsiness and meditation), alpha (8-13Hz, relaxed wakefulness — this is the one you can consciously control), and beta (13-30Hz, active concentration and problem-solving).
The moment you close your eyes and relax, you can watch your alpha power spike on the display. Open your eyes and focus on a math problem, and beta takes over. Get drowsy, and theta creeps up. This is neurofeedback — real-time visibility into your brain state — and it's genuinely mesmerizing the first time you see your own thoughts reflected as shifting bar graphs. The build quality won't match a medical-grade EEG (those use 19-64 electrodes, medical-grade amplifiers, and shielded rooms), but for single-channel brainwave exploration, meditation feedback, and understanding the basics of neural oscillations, it's remarkably capable. You can detect eye blinks (large artifacts that dwarf the EEG signal), track relaxation depth, and even experiment with simple brain-computer interfaces — like training the system to detect when you're focused vs. relaxed and using that state to control an LED or trigger an action.
🧰 Ingredients
- AD8232 biosensor module — single-lead biopotential amplifier breakout board (electronics supplier, ~$3; or salvage the instrumentation amplifier from a dead fitness tracker or pulse oximeter)
- ESP32 dev board — for sampling, FFT processing, and Bluetooth streaming (electronics supplier, ~$5)
- Dry electrodes — sanded copper pennies, stainless steel snap buttons, or Ag/AgCl ECG electrode pads (pennies — free; ECG pads ~$2 for a pack of 50)
- Elastic headband or sports sweatband — the mounting platform (dollar store, ~$1; or cut from old athletic wear)
- Conductive gel or electrode paste — improves skin contact and signal quality (pharmacy or online, ~$5; or use saline-soaked felt pads)
- Small OLED display, 0.96" I2C — for on-device waveform and bar graph display (electronics supplier, ~$2)
- 3.7V LiPo battery, 500mAh+ — for portable operation (electronics supplier, ~$3; or salvage from old Bluetooth headset)
- LiPo charger module (TP4056) — for recharging (electronics supplier, ~$0.50)
- Shielded cable or twisted pair wire — for electrode leads; reduces noise pickup (electronics supplier, ~$2)
- Conductive thread or conductive fabric — for integrating electrodes seamlessly into the headband (craft/electronics supplier, ~$3)
- Snap connectors — for detachable electrode connections (craft store, ~$2)
- Small enclosure or fabric pouch — to house the ESP32 and battery on the headband (scrap fabric — free)
- Heat shrink tubing — for insulating solder joints on electrode leads (electronics supplier, ~$1)
🔨 Build Steps
-
Prepare the electrodes. For dry electrodes, sand three copper pennies with fine-grit sandpaper until they're smooth and shiny — this removes the oxide layer and improves skin conductivity. Alternatively, use stainless steel snap buttons (the kind on jeans) or Ag/AgCl ECG pads. Solder a wire lead to the back of each electrode. If using conductive thread, sew a pad of conductive fabric into the headband at each electrode position and run conductive thread from each pad to a snap connector at the electronics housing. The electrode surface that contacts skin should be at least 10mm in diameter — larger electrodes pick up more signal.
-
Position the electrodes in the headband. Mark three positions: center forehead (Fpz in the 10-20 EEG system — this is the signal electrode), behind the left or right ear on the mastoid bone (reference electrode), and the left or right earlobe (ground/DRL electrode). The earlobe electrode can clip on separately rather than being part of the headband — use a small spring clip with a conductive pad. Sew or glue the forehead and mastoid electrodes into the headband at the marked positions, with the conductive face pointing inward toward the skin.
-
Wire electrodes to the AD8232. Connect the forehead electrode to the AD8232's IN+ (positive input). Connect the mastoid electrode to IN- (negative input/reference). Connect the earlobe electrode to the RLD (right leg drive / ground) output. Use shielded cable or tightly twisted pair wire for all electrode leads — unshielded wires act as antennas and pick up 50/60Hz powerline noise, which will completely overwhelm the microvolt-level brain signals. Keep leads as short as possible. Route them along the headband, secured with small stitches or tape.
-
Connect the AD8232 to the ESP32. Wire the AD8232's OUTPUT pin to one of the ESP32's ADC-capable GPIO pins (use ADC1 pins — GPIO 32-39 — since ADC2 conflicts with WiFi). Connect the AD8232's LO+ and LO- (leads-off detection) pins to two digital GPIO pins on the ESP32 — these go HIGH when an electrode loses skin contact, letting your software know the signal is invalid. Power the AD8232 from the ESP32's 3.3V output. Connect grounds.
-
Program the ESP32 — data acquisition. Write firmware to sample the AD8232 output at 256Hz minimum (set a hardware timer interrupt for consistent sample timing — inconsistent sampling destroys FFT accuracy). Store samples in a circular buffer of at least 256 samples (1 second of data at 256Hz). Apply a digital notch filter at 50Hz and 60Hz to remove powerline interference. Apply a bandpass filter (0.5-40Hz) to isolate the EEG frequency range and reject muscle artifacts and DC drift.
-
Program the ESP32 — FFT and frequency band extraction. Run a 256-point FFT on each full buffer of samples. The FFT output gives you the power spectral density — the amount of energy at each frequency. Sum the FFT bins within each band: delta (0.5-4Hz), theta (4-8Hz), alpha (8-13Hz), beta (13-30Hz). Normalize the band powers as percentages of total power. Display the four bands as a bar graph on the OLED, updating once per second. Color-code if using a color OLED: delta = blue, theta = green, alpha = yellow, beta = red.
-
Add Bluetooth streaming. Configure the ESP32 as a BLE (Bluetooth Low Energy) peripheral that broadcasts the raw EEG waveform and/or the band power values as BLE characteristics. Write a simple companion app (or use a generic BLE serial terminal app) on your phone to receive and plot the data in real-time. For a quick solution, stream as BLE serial text and use a phone app like Serial Bluetooth Terminal to log the data, then graph it in a spreadsheet.
-
Calibrate and test. Put on the headband, apply a small amount of conductive gel or saline solution to each electrode contact point (this dramatically improves signal quality for dry electrodes). Sit still, relax, and close your eyes — watch the alpha band power increase within 5-10 seconds. Open your eyes — alpha drops, beta rises. Blink hard — you'll see a massive artifact spike in the raw waveform (eye blinks produce millivolt-level signals that dwarf the microvolt EEG). Try mental math — beta should increase. Get drowsy — theta creeps up. If you see mostly noise and no clear brain signal, check electrode contact, add more conductive gel, and ensure your cable shielding is adequate.
-
Build the enclosure. Sew a small fabric pouch onto the headband to hold the ESP32, battery, and AD8232 module. Position it at the back of the head for balance. Add a small power switch accessible from the outside. Route the charger module's micro-USB port to an opening in the pouch for easy recharging. The goal is a clean, self-contained wearable — no dangling wires, no loose boards.
-
Add biofeedback features (optional). Mount an RGB LED on the front of the headband that changes color based on the dominant brainwave band — blue for deep relaxation (high alpha/theta), red for intense focus (high beta), green for balanced state. Or add a gentle vibration motor that buzzes when your mind starts wandering (alpha drops below a threshold), training sustained attention. This is the foundation of neurofeedback meditation aids — and you built it from a $3 sensor module.
⚠️ Safety Notes
- This device is completely safe electrically. The AD8232 operates at 3.3V and draws microamps through the electrodes — far below any perceptible or harmful level. There is zero risk of electrical shock.
- This is an educational and hobbyist device, not medical equipment. Do not use it for clinical diagnosis, seizure monitoring, or any medical purpose. The single-channel resolution is far too low for clinical EEG.
- Do not use the device near MRI machines or other strong magnetic fields — the electronics can be damaged and the fields can induce currents in the electrode wires.
- If you have epilepsy or a history of seizures, consult a doctor before experimenting with any EEG or neurofeedback device.
- Conductive gel can cause mild skin irritation with prolonged use. Clean electrode contact points after each session. If skin becomes red or irritated, discontinue use until it heals.